With the token code copmlete, you will be able to utilize this code in other python scripts by importing
the function we have created get_aci_token(). To achieve this we have to start by importing
the function from the file that we created.
In the IDE you will create a new file in:
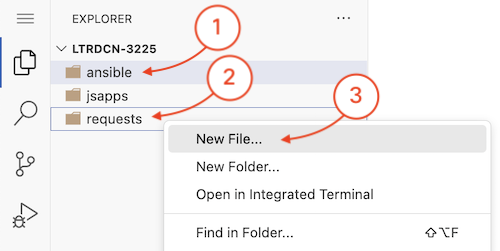
And name the file
req_aci.py
In python you can import a function from another file by using the from keyword. In this case
we are going to import the get_aci_token() function from the file
aci_auth.py.
import requests, json, os
from aci_auth import get_aci_token
This function that we are going to create is going to be a generic class query function for ACI. This will allow you to query different object classes in the fabric from the same function reference.
import requests, json, os
from aci_auth import get_aci_token

def get_fabric_class_data(aci_class):
    apic_token = get_aci_token()
Then you are going to add the same script execution verification code.
import requests, json, os
from aci_auth import get_aci_token

def get_fabric_class_data(aci_class):
    apic_token = get_aci_token()

if __name__ == "__main__":
    class_data = get_fabric_class_data("lldpAdjEp")
If you where to run the code right now, nothing would happen but the token would be retrieved. Now we can start building the URL we need for class queries with requests. The details of the request_url value now include two values added via the format function. The first is the APIC IP address that we get from the environment variable and the second is the class that we are querying.
The class is received from the invokation of the function.
import requests, json, os
from aci_auth import get_aci_token

def get_fabric_class_data(aci_class):
    apic_token = get_aci_token()

    request_url = "https://{}/api/node/class/{}.json".format(os.environ['APIC_IP'],aci_class)

if __name__ == "__main__":
    class_data = get_fabric_class_data("lldpAdjEp")
Now you will construct the request.get part of the code that will connect to the APIC
and retrieve the class query data.
import requests, json, os
from aci_auth import get_aci_token

def get_fabric_class_data(aci_class):
    apic_token = get_aci_token()

    request_url = "https://{}/api/node/class/{}.json".format(os.environ['APIC_IP'],aci_class)

    response_data = requests.get(request_url , cookies=apic_token, verify = False )

if __name__ == "__main__":
    class_data = get_fabric_class_data("lldpAdjEp")
With the final part of the function code to convert the JSON data into a Python dictionary. This is done
with the json.loads function. In the previous example (to retrieve the apic token) we utilized the
command json.dumps
to convert a Python dictionary into a JSON string. In this case we are doing the opposite. We are taking a JSON
string that we get from the REST request to the APIC and converting it into a Python dictionary.
import requests, json, os
from aci_auth import get_aci_token

def get_fabric_class_data(aci_class):
    apic_token = get_aci_token()

    request_url = "https://{}/api/node/class/{}.json".format(os.environ['APIC_IP'],aci_class)

    response_data = requests.get(request_url , cookies=apic_token, verify = False )

    class_query_data = json.loads(response_data.text)
    return class_query_data

if __name__ == "__main__":
    class_data = get_fabric_class_data("lldpAdjEp")
Add the import for the rich library and the print_json function to the script. This will allow you to
print the data in a more human readable format.
import requests, json, os
from rich import print_json
from aci_auth import get_aci_token

def get_fabric_class_data(aci_class):
    apic_token = get_aci_token()

    request_url = "https://{}/api/node/class/{}.json".format(os.environ['APIC_IP'],aci_class)

    response_data = requests.get(request_url , cookies=apic_token, verify = False )

    class_query_data = json.loads(response_data.text)
    return class_query_data

if __name__ == "__main__":
    class_data = get_fabric_class_data("lldpAdjEp")
    print_json(data=class_data)
Save your script and execute the script from the Terminal, you will get a large output of the dictionary of the adjacency objects known to the ACI fabric. The following is an example of the output (that has been cut for brevity):
python3 req_aci.py
{
  "totalCount": "xxx",
  "imdata": [
    {
      "lldpAdjEp": {
        "attributes": {
          "capability": "router",
          "chassisIdT": "reserved",
          "chassisIdV": "",
          "childAction": "",
          "dn": "topology/pod-1/node-1/sys/lldp/inst/if-[eth2/1]/adj-1",
          "enCap": "",
          "id": "1",
          "mgmtId": "0",
          "mgmtIp": "unspecified",
          "mgmtPortMac": "unspecified",
          "modTs": "2023-06-22T16:01:10.911-04:00",
          "monPolDn": "uni/fabric/monfab-default",
          "name": "",
          "portDesc": "topology/pod-1/paths-207/pathep-[eth1/44]",
          "portIdT": "local",
          "portIdV": "Eth1/44",
          "portVlan": "unspecified",
          "stQual": "",
          "status": "",
          "sysDesc": "topology/pod-1/node-207",
          "sysName": "L7.ecatsrtpdmz.cisco.com",
          "ttl": "0"
        }
      }
    },
[CUT]
To expand showing you this capability, a single change made to the request_url can generate the list of
endpoints that the fabric has learned! Using the exact same code you did for the LLDP neighbors. The
class for endpoints is fvCEp (as we discovered earlier). All you have to do is change the URL to
/node/class/fvCEp.json
import requests, json, os
from rich import print_json
from aci_auth import get_aci_token

def get_fabric_class_data(aci_class):
    apic_token = get_aci_token()

    request_url = "https://{}/api/node/class/{}.json".format(os.environ['APIC_IP'],aci_class)

    response_data = requests.get(request_url , cookies=apic_token, verify = False )

    class_query_data = json.loads(response_data.text)
    return class_query_data

if __name__ == "__main__":
    class_data = get_fabric_class_data("fvCEp")
    print_json(data=class_data)
Save your Python script and when you execute this in your Terminal window, you will get the list of endpoints that the ACI Fabric knows about.
python3 req_aci.py
{
  "totalCount": "xxx",
  "imdata": [
    {
      "fvCEp": {
        "attributes": {
          "annotation": "",
          "baseEpgDn": "",
          "bdDn": "",
          "childAction": "",
          "contName": "",
          "dn": "uni/tn-aci_p07_tenant/ctx-aci_p07_vrf/cep-00:3A:7D:E9:48:89",
          "encap": "unknown",
          "esgUsegDn": "",
          "extMngdBy": "",
          "fabricPathDn": "topology/pod-1/paths-203/pathep-[eth1/7]",
          "hostingServer": "",
          "id": "0",
          "idepdn": "",
          "lcC": "learned",
          "lcOwn": "local",
          "mac": "00:3A:7D:E9:48:89",
          "mcastAddr": "not-applicable",
          "modTs": "2024-01-10T10:13:52.692-04:00",
          "monPolDn": "uni/tn-common/monepg-default",
          "name": "00:3A:7D:E9:48:89",
          "nameAlias": "",
          "reportingControllerName": "",
          "status": "",
          "uid": "0",
          "userdom": "all",
          "uuid": "",
          "vmmSrc": "",
          "vrfDn": "uni/tn-aci_p07_tenant/ctx-aci_p07_vrf"
        }
      }
    },
[CUT]
Now that you know how to extract response data from the ACI Fabric, we can do a quick tutorial on how to manage that data and get a better representation of that data.
The response for the ACI endpoints is structured as:
{"imdata":[
    {"fvCEp":
        {"attributes":{
            "mac": value,
            "dn": value,
            "encap": value,
The request is contained inside a dictionary with a key called imdata. Aftewards every object
is contained in a list. In this case every dictionary in the list starts with an index fvCEp that is
the
requested class query object. You will get a dictionary for every endpoint in the ACI fabric.
Since you want to extract specific information from that class query, you will have to build iteration code to parse through the list. One way to accomplish this is to create a list of keys that you wish to extract from the dictionary.
We will be using the python regular expression library to extract the data that we want from the response data structure of the fabric.
import requests, json, os, re
from rich import print_json
from aci_auth import get_aci_token

def get_fabric_class_data(aci_class):
    apic_token = get_aci_token()

    request_url = "https://{}/api/node/class/{}.json".format(os.environ['APIC_IP'],aci_class)

    response_data = requests.get(request_url , cookies=apic_token, verify = False )

    class_query_data = json.loads(response_data.text)
    return class_query_data

if __name__ == "__main__":
    class_data = get_fabric_class_data("fvCEp")
    print_json(data=class_data)
As you saw, the fvCEp class query returns a list of endpoints. In a large fabric this can be a huge data set. For this lab what we are going to do is process this data into a smaller subset of data to display in a more human consumable format.
To accomplish some of this we are going to do what is called an iteration. Iterations are a
programing terminology
when you repeat code logic. Therefore, in this case we are taking a long set of data that the
APIC returned
and processing the different key,value pairs to get the data that we want to show.
import requests, json, os,re
from rich import print_json
from aci_auth import get_aci_token

def get_fabric_class_data(aci_class):
    apic_token = get_aci_token()

    request_url = "https://{}/api/node/class/{}.json".format(os.environ['APIC_IP'],aci_class)

    response_data = requests.get(request_url , cookies=apic_token, verify = False )

    class_query_data = json.loads(response_data.text)
    return class_query_data

def parse_fabric_endpoint_data(aci_class_data):
    parsed_endpoint_data= []


if __name__ == "__main__":
    class_data = get_fabric_class_data("fvCEp")
    print_json(data=class_data)
You can see that the key imdata is a list. This is because in JSON the structure of a list is
denoted inside of a square bracket [].
{
  "totalCount": "xxx",
  "imdata": [
    {
      "fvCEp": {
        "attributes": {
          "annotation": "",
          "baseEpgDn": "",
          "bdDn": "",
          "childAction": "",
          "contName": "",
          "dn": "uni/tn-aci_p07_tenant/ctx-aci_p07_vrf/cep-00:3A:7D:E9:48:89",
[cut]
Since this is a list of fvCEp objects, we iterate over this list.
Each of those we then extract the attributes dictionary
and assign it to a new dictionary called endpoint_data. In python
we utilize the for keyword to achieve the iteration logic.
import requests, json, os,re
from rich import print_json
from aci_auth import get_aci_token

def get_fabric_class_data(aci_class):
    apic_token = get_aci_token()

    request_url = "https://{}/api/node/class/{}.json".format(os.environ['APIC_IP'],aci_class)

    response_data = requests.get(request_url , cookies=apic_token, verify = False )

    class_query_data = json.loads(response_data.text)
    return class_query_data

def parse_fabric_endpoint_data(aci_class_data):
    parsed_endpoint_data= []

    for endpoint in aci_class_data['imdata']:
        endpoint_data = endpoint['fvCEp']['attributes']

if __name__ == "__main__":
    class_data = get_fabric_class_data("fvCEp")
    print_json(data=class_data)
With the iteration logic in place, we can now extract the data that we want from the endpoint_data
dictionary. In this case we are going to extract the dn and mac keys from the
dictionary. We are going to use the python regular expression library to extract the data that we want.
Then you take the data and append this into a new list that contains only the data that we are
interested in from the fvCEp object class.
import requests, json, os,re
from rich import print_json
from aci_auth import get_aci_token

def get_fabric_class_data(aci_class):
    apic_token = get_aci_token()

    request_url = "https://{}/api/node/class/{}.json".format(os.environ['APIC_IP'],aci_class)

    response_data = requests.get(request_url , cookies=apic_token, verify = False )

    class_query_data = json.loads(response_data.text)
    return class_query_data

def parse_fabric_endpoint_data(aci_class_data):
    parsed_endpoint_data= []

    for endpoint in aci_class_data['imdata']:
        endpoint_data = endpoint['fvCEp']['attributes']

        dn_breakdown_re = re.search("tn-(\w*)\/ap-(\w*)\/epg-(\w*)\/cep-(\w*:\w*:\w*:\w*:\w*:\w*)",endpoint_data['dn'])

        if dn_breakdown_re:
            tenant = dn_breakdown_re.group(1)
            app = dn_breakdown_re.group(2)
            epg = dn_breakdown_re.group(3)
            mac = endpoint_data["mac"]
            table_row=[ tenant, app, epg, mac ]
            parsed_endpoint_data.append(table_row)

    return parsed_endpoint_data


if __name__ == "__main__":
    class_data = get_fabric_class_data("fvCEp")
    print_json(data=class_data)
And then finally you have to change the invokation of this function from the main block of the
script.
import requests, json, os,re
from rich import print_json
from aci_auth import get_aci_token

def get_fabric_class_data(aci_class):
    apic_token = get_aci_token()

    request_url = "https://{}/api/node/class/{}.json".format(os.environ['APIC_IP'],aci_class)

    response_data = requests.get(request_url , cookies=apic_token, verify = False )

    class_query_data = json.loads(response_data.text)
    return class_query_data

def parse_fabric_endpoint_data(aci_class_data):
    parsed_endpoint_data= []

    for endpoint in aci_class_data['imdata']:
        endpoint_data = endpoint['fvCEp']['attributes']

        dn_breakdown_re = re.search("tn-(\w*)\/ap-(\w*)\/epg-(\w*)\/cep-(\w*:\w*:\w*:\w*:\w*:\w*)",endpoint_data['dn'])

        if dn_breakdown_re:
            tenant = dn_breakdown_re.group(1)
            app = dn_breakdown_re.group(2)
            epg = dn_breakdown_re.group(3)
            mac = endpoint_data["mac"]
            table_row=[ tenant, app, epg, mac ]
            parsed_endpoint_data.append(table_row)

    return parsed_endpoint_data


if __name__ == "__main__":
    class_data = get_fabric_class_data("fvCEp")
    parsed_endpoint_data = parse_fabric_endpoint_data(class_data)
    print_json(data=parsed_endpoint_data)
Again, save your script and return to your Terminal window. When you execute the script, the output would be as:
python req_aci.py
  [
    "mgmt",
    "INB_MGMT",
    "MGMT_V336",
    "B8:38:61:D7:F3:78"
  ],
  [
    "mgmt",
    "INB_MGMT",
    "MGMT_V336",
    "58:F3:9C:89:99:3E"
  ],
[CUT]
Now that we have completed the task of parsing the data, we can improve the output of the data. We can use the
rich library to print the data in a more human readable format. We have used the print_json function
in the previous example, now we are going to utilize a new function to output the data in a table format.
You will now add the import for the rich.table library and the Table class to the script
and remove the print_json function from the script.
import requests, json, os,re
from rich import print_json
from aci_auth import get_aci_token
from rich.console import Console
from rich.table import Table

def get_fabric_class_data(aci_class):
    apic_token = get_aci_token()

    request_url = "https://{}/api/node/class/{}.json".format(os.environ['APIC_IP'],aci_class)

    response_data = requests.get(request_url , cookies=apic_token, verify = False )

    class_query_data = json.loads(response_data.text)
    return class_query_data

def parse_fabric_endpoint_data(aci_class_data):
    parsed_endpoint_data= []

    for endpoint in aci_class_data['imdata']:
        endpoint_data = endpoint['fvCEp']['attributes']

        dn_breakdown_re = re.search("tn-(\w*)\/ap-(\w*)\/epg-(\w*)\/cep-(\w*:\w*:\w*:\w*:\w*:\w*)",endpoint_data['dn'])

        if dn_breakdown_re:
            tenant = dn_breakdown_re.group(1)
            app = dn_breakdown_re.group(2)
            epg = dn_breakdown_re.group(3)
            mac = endpoint_data["mac"]
            table_row=[ tenant, app, epg, mac ]
            parsed_endpoint_data.append(table_row)

    return parsed_endpoint_data


if __name__ == "__main__":
    class_data = get_fabric_class_data("fvCEp")
    parsed_endpoint_data = parse_fabric_endpoint_data(class_data)
    print_json(data=parsed_endpoint_data)
You will now initialize the table and add the headers to the table. The headers are the first row of the table
and are used to describe the data that is in the table. In this case the headers are Tenant,
Application Profile, EPG and MAC.
import requests, json, os,re
from rich import print_json
from aci_auth import get_aci_token
from rich.console import Console
from rich.table import Table

def get_fabric_class_data(aci_class):
    apic_token = get_aci_token()

    request_url = "https://{}/api/node/class/{}.json".format(os.environ['APIC_IP'],aci_class)

    response_data = requests.get(request_url , cookies=apic_token, verify = False )

    class_query_data = json.loads(response_data.text)
    return class_query_data

def parse_fabric_endpoint_data(aci_class_data):
    parsed_endpoint_data= []

    for endpoint in aci_class_data['imdata']:
        endpoint_data = endpoint['fvCEp']['attributes']

        dn_breakdown_re = re.search("tn-(\w*)\/ap-(\w*)\/epg-(\w*)\/cep-(\w*:\w*:\w*:\w*:\w*:\w*)",endpoint_data['dn'])

        if dn_breakdown_re:
            tenant = dn_breakdown_re.group(1)
            app = dn_breakdown_re.group(2)
            epg = dn_breakdown_re.group(3)
            mac = endpoint_data["mac"]
            table_row=[ tenant, app, epg, mac ]
            parsed_endpoint_data.append(table_row)

    return parsed_endpoint_data


if __name__ == "__main__":
    class_data = get_fabric_class_data("fvCEp")
    parsed_endpoint_data = parse_fabric_endpoint_data(class_data)

    table = Table(title="Endpoint List")
    table.add_column("Tenant", style="cyan", no_wrap=True)
    table.add_column("App Profile", style="magenta")
    table.add_column("End Point Group", style="green")
    table.add_column("MAC Address", style="black")
Now you will add the iteration data to the table and print the table. The iteration data is the data that you
parsed from the fvCEp class query. You will use the add_row function to add the
data to the table.
import requests, json, os,re
from rich import print_json
from aci_auth import get_aci_token
from rich.console import Console
from rich.table import Table

def get_fabric_class_data(aci_class):
    apic_token = get_aci_token()

    request_url = "https://{}/api/node/class/{}.json".format(os.environ['APIC_IP'],aci_class)

    response_data = requests.get(request_url , cookies=apic_token, verify = False )

    class_query_data = json.loads(response_data.text)
    return class_query_data

def parse_fabric_endpoint_data(aci_class_data):
    parsed_endpoint_data= []

    for endpoint in aci_class_data['imdata']:
        endpoint_data = endpoint['fvCEp']['attributes']

        dn_breakdown_re = re.search("tn-(\w*)\/ap-(\w*)\/epg-(\w*)\/cep-(\w*:\w*:\w*:\w*:\w*:\w*)",endpoint_data['dn'])

        if dn_breakdown_re:
            tenant = dn_breakdown_re.group(1)
            app = dn_breakdown_re.group(2)
            epg = dn_breakdown_re.group(3)
            mac = endpoint_data["mac"]
            table_row=[ tenant, app, epg, mac ]
            parsed_endpoint_data.append(table_row)

    return parsed_endpoint_data


if __name__ == "__main__":
    class_data = get_fabric_class_data("fvCEp")
    parsed_endpoint_data = parse_fabric_endpoint_data(class_data)

    table = Table(title="Endpoint List")
    table.add_column("Tenant", style="cyan", no_wrap=True)
    table.add_column("App Profile", style="magenta")
    table.add_column("End Point Group", style="green")
    table.add_column("MAC Address", style="black")

    for row in parsed_endpoint_data:
        table.add_row(row[0],row[1],row[2],row[3])

    console = Console()
    console.print(table)
Save your script and return to your Terminal window. When you execute the script.
python3 req_aci.py
                               Endpoint List
┏━━━━━━━━━━━━━━━━┳━━━━━━━━━━━━━━━━━┳━━━━━━━━━━━━━━━━━━┳━━━━━━━━━━━━━━━━━━━┓
┃ Tenant         ┃ App Profile     ┃ End Point Group  ┃ MAC Address       ┃
┡━━━━━━━━━━━━━━━━╇━━━━━━━━━━━━━━━━━╇━━━━━━━━━━━━━━━━━━╇━━━━━━━━━━━━━━━━━━━┩
│ infra          │ access          │ default          │ FC:5B:39:5B:5B:41 │
│ infra          │ access          │ default          │ FC:5B:39:82:C1:59 │
│ infra          │ access          │ default          │ FC:5B:39:82:C0:57 │
│ aci_p09_tenant │ aci_p09_ap_mgmt │ aci_p09_epg_mgmt │ 00:50:56:03:00:09 │
│ aci_p09_tenant │ aci_p09_ap_mgmt │ aci_p09_epg_mgmt │ 00:50:56:01:00:09 │
│ aci_p09_tenant │ aci_p09_ap_mgmt │ aci_p09_epg_mgmt │ 00:50:56:02:00:09 │
│ aci_p09_tenant │ aci_p09_ap_mgmt │ aci_p09_epg_mgmt │ 00:50:56:04:00:09 │
And that shows you how we can take data from the APIC, process it in python to create structured data and then output that data in a human readable format. This capability can be tailored in an infinite amount of ways to suit your needs.