As programming became more complex, the need was introduced to include testing of code alongside the code that was developed. So for example if a developer had to write code to verify if the IP address is correctly formatted based on user input, he would also write code to verify the code he had written.
How would he accomplish this? Code would exist alongside the created code and classified as such so that some process would kick-in and test it. The developer would write code that would feed some example IP addresses that would pass through the developed functions or classes and would validate with what it knew to be the correct answers. If the execution didn't match the expected results, the test would fail and the pipeline would stop at the defined stage and fail to proceed until the problem was resolved.
These validations would be automatic and would happen when developers would be working developing code and would create source code management actions, like commits. These different tests would find bugs early in the development process and became de-facto standard process for development of code in most projects.
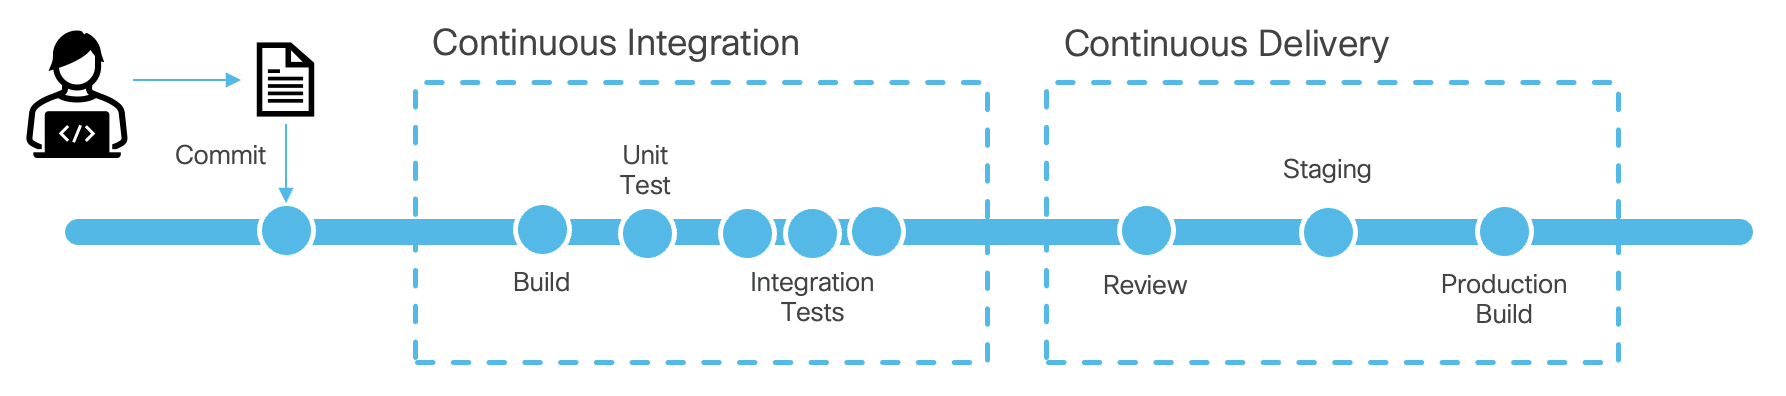
Including these testing elements alongside the build requirements for these software proejcts, lead to what we know today as a software buid pipeline which was then known in the industry as CI/CD, or continous integration and countinous delivery. The key part of this is the word continous because pipeline are by definition driving a continuous process that is executed automatically based on changes registered in a source code repository.
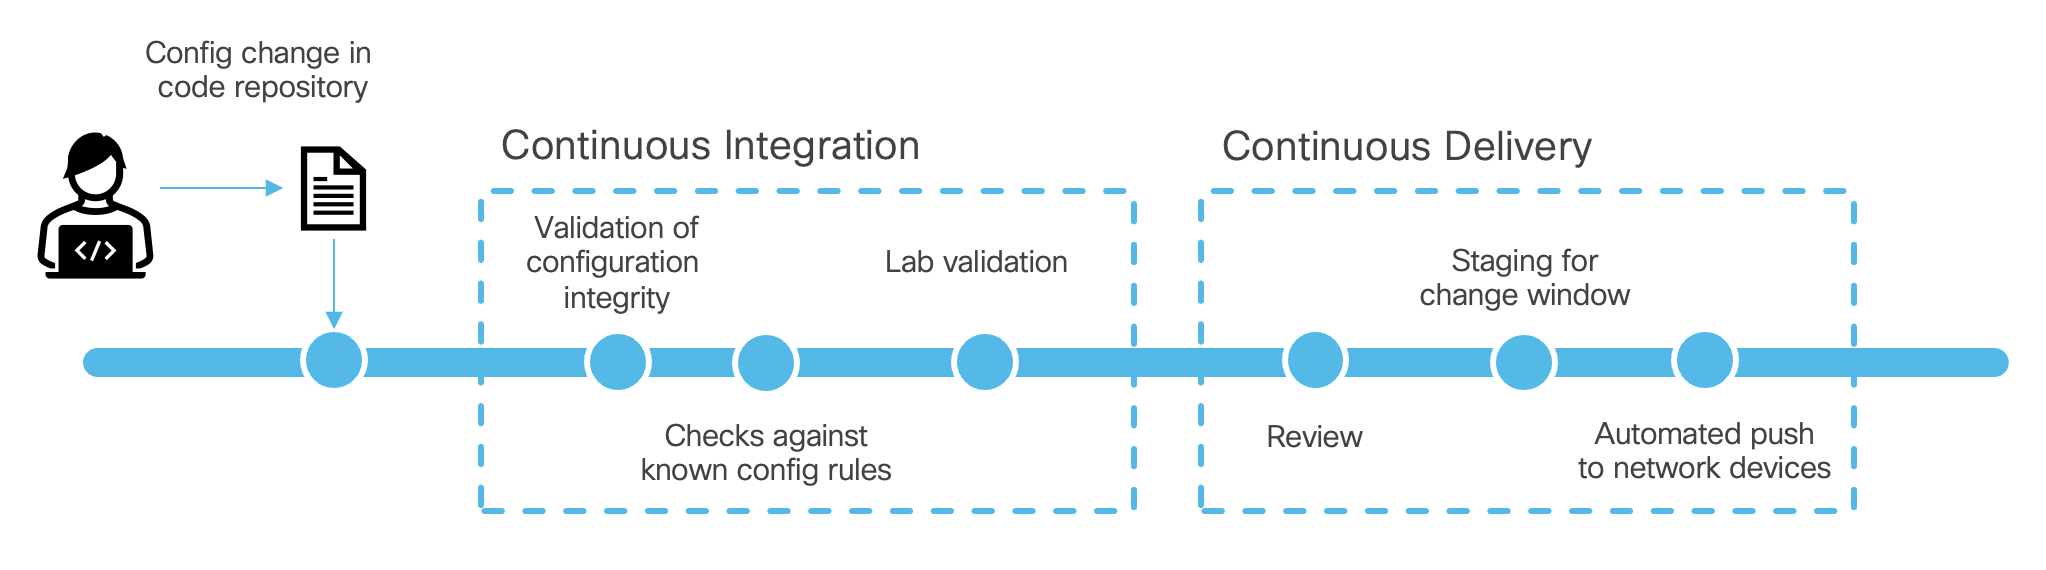
How does this relate to network operators? As time has progressed and automation requirements grow, these software disciplines can be used to manage network change. Instead of managing change in a network window with your fingers, copy/paste and other older methods; the network operator could load into code the changes that are required and during the window just run the automation such that it completes the task. Incorporate this capability with the source control version revision checks, and you would have a robust history of changes tied with automated pushes into the network.
Utilizing the previous example, the operator could make a change to the ansible files
you created before. Then the operator would commit the code and based
on this commit action the software in GitHub or GitLab could take an
action. In this section you will see how some of these actions are defined in your
repository for the format that is used for GitLab.
To avoid people writting code over each other, SCM's like GIT utilize the concept of code branches. These code branches allow the developer to work on code without colliding with other people that are working on the same code. This is a very important concept in software development and is also used in network automation.
We have created this repo with Ansible and pushed the code into the develop
branch. We defined this branch as the default branch and we did this such that we
leave the primary branch ( usually known as master or main ) untouched and focused only
on our automation pipeline efforts.
The reason we do this is that you can define in your pipeline definition file when stages of automation would be executed. For example you could have defined in the repository that a validation against golden rules for configuration be conducted whenever an engineer commits changes either in his working branch or when pushing into the develop branch. And that the actual push into production would only be possible when the code is pushed into the primary branch.
Since we can also lock the primary branch such that developers can't commit into it, the only way to push changes into production is via merge requests that would go through a process of review and approval. This is a very powerful concept that allows you to control the flow of changes into production.
Originally when we created the repository we created it with the default branch that is where the primary code is stored. Yet in CI/CD environments we distinguish between the working branch of code and what we consider the primary branch on which automation is run. So we want to follow best practices, you are going to create a primary branch on the repository that is going to be called: main.
In this step we are going to create the main branch on the GitLab Server. Click on the URL to the right. Credentials in-case you need them are listed.
dcn3225_pod04
securepassword
Once at the page you are going to click on the plus sign besides the repositry and then click on New branch.
Now you will enter the branch name
main
and click on Create
branch.
There is nothing else left to do. Currently main is empty and we will populate it in the next steps.
For these next steps return back to the Visual Studio Code window.
GitLab utilizes the fiie .gitlab-ci.yml to define the pipeline execution. This file is located in the
root of the repository. Like many pipeline execution configuration files, GitLab defines a series of steps that it
calls stages. This allows you to break down the execution in easy to understand steps. In our
example we will define one stage: deploy.
These stages perform different tasks based on executing actions inside of the execution pipeline. Here is where
you will add stages like testing, validation, deployment, etc. In our case we will define a stage called
deploy
that will execute the ansible playbook that we created in the previous section.
Containers are utilized in many cases to package the execution environment for the pipeline. In our case we have created a container that contains Python and all the required libraries for us to run the ansible modules inside the Cisco.ACI ansible galaxy modules.
Create the file
.gitlab-ci.yml
in the ansible directory as viewed below and add the
contents below into the file ( this is the top level of the repository that you created).
code-server ~/ltrdcn-3225/ansible/.gitlab-ci.yml
This command will open the Visual Studio Code editor and create the file in the
ansible directory.
---
stages:
  - deploy

image: rafmuller/ansiblerunner:v1.2

variables:
  ANSIBLE_HOST_KEY_CHECKING: 'false'
  ANSIBLE_FORCE_COLOR: 'true'

deploy:
  allow_failure: false
  environment: production
  stage: deploy
  only:
    - main
  script:
    - cd playbooks/aci
    - ansible-playbook -i hosts.yml site.yml
With the file created, we need to add it to the repository and commit it.
git add .
git status
If you check the status of git after running the git add command you will see that the file is ready to be committed.
    On branch develop
    Your branch is up to date with 'origin/develop'.

    Changes to be committed:
      (use "git restore --staged <file>..." to unstage)
            new file:   .gitlab-ci.yml
Now run the git commit command.
git commit -a -m "Added gitlab-ci file"
And now you can run the git push command to push the changes into the repository.
git push
For these next steps return back to the GitLab Web page.
Now that we have created the file and pushed it into the repository, we need to create a merge request to push the code into the main branch. This is the branch that we will use to execute the pipeline.
The menus on GitLab might look different based on what you clicked when looking around.
You need to click on </> Code menu to select the Merge Requests option which will present you with the screen below.

For which you will click on the New merge request button.
Then the following screen will be presented to you. You will select the develop branch as the source
branch and the main as the target branch. Then click on the Compare
branches and continue button.
You will be presented with the screen to the right. This is the merge request form for GitLab. See the different fields that are available. You can add reviewers, assignees, labels, etc. You can also add a description of the merge request. This is a good practice to add a description of the changes that you are making. This will help the reviewers understand what you are doing and why.
For this lab we will not add any reviewers or assignees. We will leave the default values. To setup review and approval processes does require more configuration and is outside the scope of this lab.
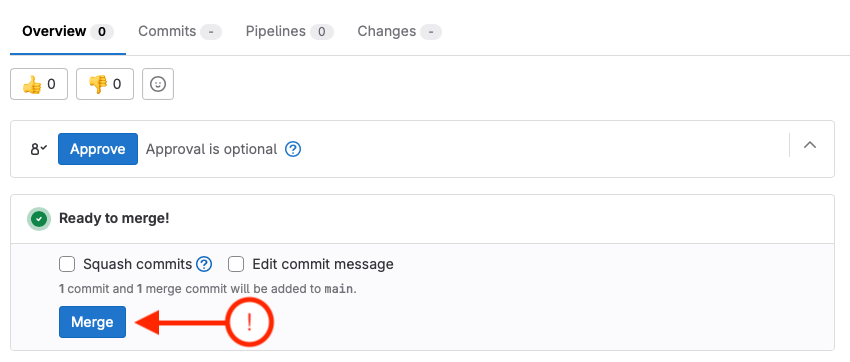
After clicking Create Merge Request the following screen will be presented to you. This is the merge request window and it will first check to make sure that the merge can actually happen. If there are no conflicts, you will see the screen to the right.
At which point you can click on the Merge button.
Once the merge is completed, now the activity initiated by the pipeline will begin. The pipeline will run becuase the merge request was pushed towards the main branch and we configured the GitLab-CI file to only execute deploy on the main branch.
    stage: deploy
    only:
        - main
Execution runners are registered to GitLab from different servers that host the automation execution environment. This is done by a service running on a linux server that connects back to GitLab and it allows GitLab to execute different containers. These execution environments are usually linux hosts that have docker installed and the docker containers are able to reach the destination network equipment.
Click on the pipeline link to see the execution of the pipeline.
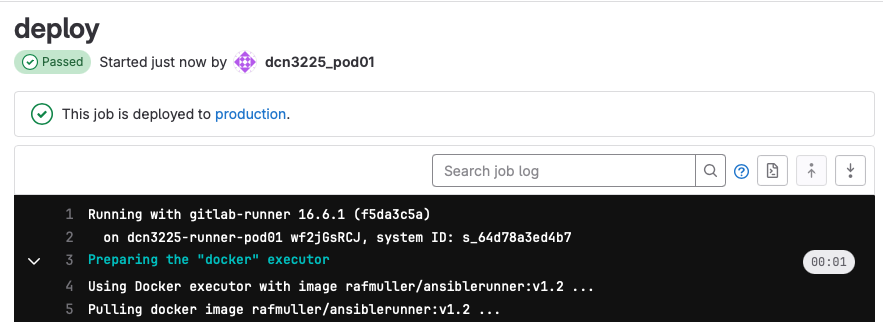
As you can see we have a single execution stage in this pipeline. What is ocurring is that in the remote linux server the docker container is being executed and the ansible playbook is being executed inside of the container.
GitLab is able to show you the output of the execution of the pipeline by clicking on the stage.
The output that you see here is very similar to what you saw before when you ran the ansible playbooks from the CLI.
One of the advantages of these pipelines is historical information storage of execution. The output of the execution is stored in the GitLab server and you can see the output of the execution of the pipeline at any point. Which is valuable to know what took place during an automation run. If the automation is just run from someones laptop, you would not have this information unless the person stored the logs.


On the next page we will then make a change in our ansible code and push it into the repository and see how the pipeline executes again when we complete the merge request into the main branch. This will allow us to see the complete process including pushing changes to the ACI fabric.