Ansible Automation Platform has grown over the past years to provide powerful automation solutions that work for operators, administrators and IT decision makers across a variety of technology domains. It’s a leading enterprise automation solution from Red Hat®, a thriving open source community, and the de facto standard technology of IT automation.
Ansible Automation Platform includes certified Content Collections for a variety of vendor networking solutions, helping you deliver automation more quickly with trusted, reusable automation. Certified content collections are developed and delivered by Red Hat and partners (including Cisco ) and are supported as part of a RedHat subscription. In addition to fully certified automation content provided through your Red Hat subscription, Ansible Galaxy allows automators to test, learn and share community-led automation content.
You will be using the embedded terminal window for this page:
Python was conceived into this world in the late 80's by Guido van Rossum in the Netherlands. It has gained momentum over the years in many scientific circles due to it's magnificent mathematical libraries that have performance that rivals compiled languages like C. As time passed Python has also become the default scripting language in many technology areas including networking.
That popularity was primordially pushed by Google over the years. Python appeals to programmers that come from a C background and that was on purpose, as something that originally Guido attempted to accomplish.
Yet, before we install packages we want to utilize a very powerful framework that exists for Python called virtual environments. Virtual environments make it possible to install specific versions of packages in a way that your application requirements don't affect another application requirement. For example, if you have requirements for a specific version of a software development kit (SDK) or software package that is matched to your application, you want to only have that setup for your application. If another application needs a different version of the same SDK, virtual environments make it possible.
Whenever you wish to run Ansible you have to setup the Python environment to work with it. In Python world you could just install everything to the system level ( think as you where installing an application for everyone in the system ) or you can install it creating what is known as a virtual environment.
Python virtual environments allow for easy packaging of the requirements that specific Python
code needs to run. For example you can install different versions of Ansible in different virtual environments
for many reasons. You could have some automation that you know works with a specific version and you don't
wish to gamble that it would work in a newer release.
The first step using pyenv is to install the version of Python that you wish to use. In this case
we will be installing Python 3.12.10. This is the version that is used in this lab
and it is the version that is used in the Ansible content that you will be using. Due to
the fact that this downloads and compiles Python, we have completed this task ahead for you.
The command would be pyenv install 3.12.10
When you install the version of python with pyenv, it will provide you with a list of installed versions. This is one of the key benefits of using pyenv, as it allows you to manage multiple versions of Python on your system.
pyenv versions
* system (set by /home/pod04/.pyenv/version)
  3.12.10
This will tell the system to default to this version of Python outside of the virtual environment. The advantage of using PyEnv is that it allows for you to run your specific version of Python in your Shell while not having to change the system install Python. This is very valuable as linux distributions are normally a little behind in regards to latest versions of Python due to the integration testing that they conduct.
pyenv global 3.12.10
With the right version of Python installed, now you will create a Python virtual environment around this version of Python.
pyenv virtualenv 3.12.10 ansible
Move to the Ansible directory for all our Ansible code.
cd ~/ltrdcn-3225/ansible
Create the directory for all our Ansible code.
pyenv local ansible
And with that by being inside of this directory and its children the virtual environmet will
be activated. You can see this with the command pyenv versions
pyenv versions
  system
  3.12.10
  3.12.10/envs/ansible
* ansible --> /home/pod4/.pyenv/versions/3.12.10/envs/ansible (set by /home/pod4/ltrdcn-3225/ansible/.python-version)
PIP is a package management system for Python. It allows you to install and manage packages
that are outside of the standard Python library.
Many packages are made available by
the community of Python developers and these packages are located in PyPi.
You will be using PIP in this lab to install some of these additional packages for Python
including Ansible and requests.
Good practice to upgrade pip to latest.
pip install --upgrade pip
There are two ways to install Ansible, installing everything or only the components that you need.
pip install ansible-core |
pip install ansible |
|
|
It is best practice to install only what is needed in automation. The more software that you install the bigger the chance that you will end up with software that might need updating for various reasons.
We are going to install a specific version also that we are aware is working correctly. This is also a best practice to avoid unknown changes causing problems when execution runs at a different date.
pip install ansible-core==2.17.8
Once complete you can then start using Ansible. But first we have to install some additional packages to make everything work for ACI.
Now you will be using the pip package installer to install Ansible in your virtual environmet. Since
we only installed the core components we will have to install the ACI collection. This is done with the
command ansible-galaxy which is the command to install collections. In addition to the ACI
collection we will also install the community.general collection which is a collection that contains
many useful modules that are not part of the core Ansible distribution.
ansible-galaxy collection install cisco.aci
ansible-galaxy collection install ansible.posix
ansible-galaxy collection install community.general
The ansible linter integrates with the integrated development enviroment to assist you in properly configuring Ansible data structures and playbooks.
pip install ansible-lint
And just like that we are ready to start building connections to the ACI fabric.
One key element when using a virtual environment is to make sure that the IDE is configured to use the virtual environment. This is done by configuring the Python interpreter to use the virtual environment. In Visual Studio Code you can do this by selecting the interpreter from the command pallete.
Click on the bottom left corner of the IDE to open the command pallete.
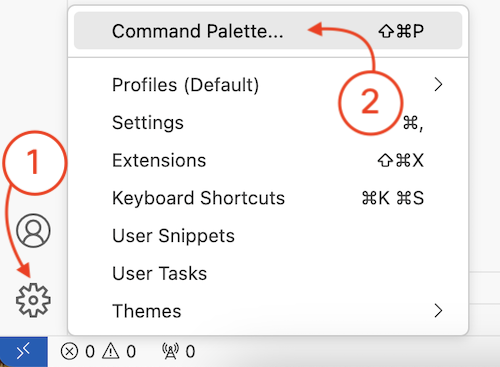
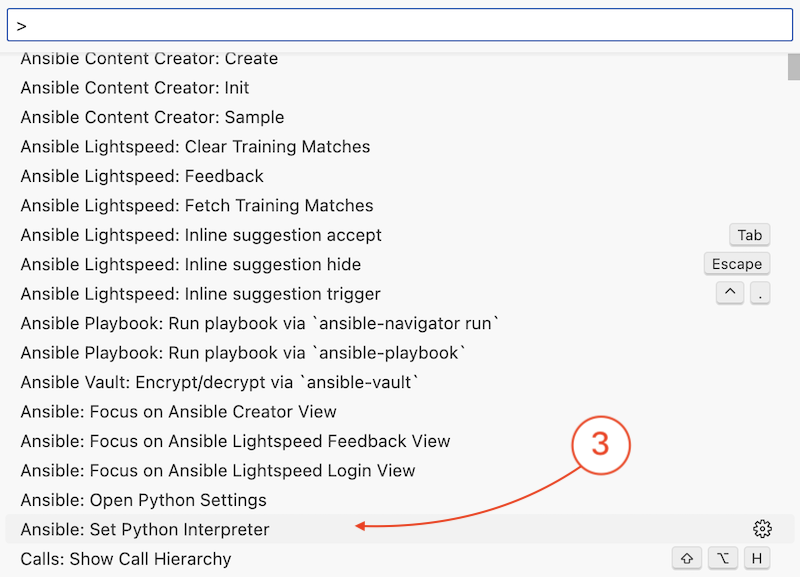
Click on Ansible: Set Python Interpreter ( you may scroll or start typing to find it )
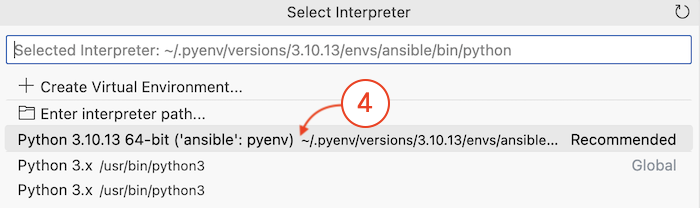
Select the option that is listed as:
Python 3.12.10 64-bit ('ansible') ~/.pyenv/versions/3.12.10/envs/ansible/bin/python
The interface to Visual Studio Code will restart to adjust to the new configuration