You are now going to work on the file create_net.html. In this file we have
already made most of the boilerplate code to just leave you to focus on the ACI interaction
components. The file that we added the aci functions in, is also already called from
this file for simplicity.
When you open this file in the editor you will notice that is a long file with many components. If you look at the running application, this file is what is shown when you click the Create Network section.
To accomodate all thirty students in this lab, we have place some controls. You will need to
modify a variable that will be hardcoded in javascript in the file create_net.html.
Around line number 350 should be a line with a variable called tenant_name. You need to
set the variable to aciproglab04.
<script type="text/javascript">
    var tenant_name='aciproglab04'
In the previous chapters you worked on a function that placed GET requests to the ACI fabric to retrieve data. In a ReST interface, when you are sending data to a destination endpoint ( in this case the ACI fabric ), you have to utilize the POST or PUT method. The ACI fabric only supports the POST method.
In these requests the payload contain the data that you would be sending to the destination endpoint. You may have noticed that I have not used the term SERVER/CLIENT on this description because it can be confusing. A Client computer can be the host of a ReST interface that receives POST requests for information. So it is better to refer as destination endpoints at which a request is being made.
For this lab we are going to make a simple, albeit not optimal way of showing this process. A new function is going to be built to utilize the jquery library for the post request. Since you have seen the GET method to retrieve classQuery data from the fabric, you will see some very similar structure to the POST method.
In the file create_net.html you are going to start working in adding this function. You
will be working toward line numbers after 352 before the $(document).ready(function (){})
function.
function post_aci_object_via_jquery(aci_object){
    return $.ajax({
        url: 'https://' + $.cookie('apic_ip') + '/api/mo/uni.json',
        type: 'post',
        headers: {
            devcookie: $.cookie('token'),
            'APIC-challenge': $.cookie('urlToken'),
        },
        data: JSON.stringify(aci_object),
        contentType: 'application/json',
        dataType: 'json',
    }).success(function(data){
        console.log("Object was posted into ACI fabric!")
        console.log(data)
    }).error(function(data){
        console.log("Object POST !!!FAILED!!!")
        console.log(data)
    })
}
The first thing to notice is the URL. For this example you will be utilizing a
general URL that is /api/mo/uni.json. Inside the objects that we
created is the attribute.dn that contains the actual location of the object in the
tree.
The second thing to notice is that you have to add the type: value to be post to
indicate
that a POST request is required. The headers are the same that you utilized
before. We just use the values stored in cookies to pass them along when the request is made.
Then you have a very important component that is data. This is what the request is going
to insert into the payload of the request to the ACI fabric. This will contain the JSON object. Now you
have create the object in javascript, but to be able to send that programatic object to the remote
destination it needs to be converted into a string before placed in the payload. This
is accomplished by utilizing the function JSON.stringify(aci_object) code in the
request. At this point the object is serialized and placed in the payload.
To assist with any troubleshooting we have included success and error handler callbacks so that the data that APIC returns is available in the browser console.
In a browser everything revolves around what is known as events. These events might be mouse moving over objects, users filling forms or users clicking on buttons. We have already placed all the code and also the event listener code. Event listener seems complex but it's really not. When you create a button in HTML on a browser page the browser automatically adds the backend event listener funcionality. As a javascript developer all you have to do is tell the browser what to do when the user clicks the button.
You have to locate in the file in the high 400's ( should be close to line 490)
line numbers the a event handler in javascript that starts with $("#net_form").submit
that we have added for you.
$("#net_form").submit(function (event) {
    app_profile = $("#app").val();
    vrf = $("#vrf").val();
    bd_name = $("#net_name").val();
    bd_subnet = $("#subnet").val();

});
In this code you only see that when a user presses the submit button it grabs from the web form the various values that the user selected in the form or entered directly. With that data you can then invoke the functions that your constructed to create the javascript objects that we need. Now you have to call those object functions that you built.
Add the following two lines:
$("#net_form").submit(function (event) {
    app_profile = $("#app").val();
    vrf = $("#vrf").val();
    bd_name = $("#net_name").val();
    bd_subnet = $("#subnet").val();
    bd_object = bridge_domain_object(tenant_name, vrf, bd_name, bd_subnet, "created,modified");
    epg_object = end_point_group(tenant_name, app_profile, bd_name, "created,modified");

});
With this, you have two variables bd_object and epg_object in the
correct structure to be sent to the fabric.
The following code is similar to what you did in the past. Here we first request to get a refresh set of tokens and then we call the function that was built to send the POSTS to the ACI fabric with the .then() javascript functionality. This is based on the promises capabilities of javascript to post the object and wait until it completes to then post the second one and wait until it completes.
$("#net_form").submit(function (event) {
    app_profile = $("#app").val();
    vrf = $("#vrf").val();
    bd_name = $("#net_name").val();
    bd_subnet = $("#subnet").val();
    bd_object = bridge_domain_object(tenant_name, vrf, bd_name, bd_subnet, "created,modified");
    epg_object = end_point_group(tenant_name, app_profile, bd_name, "created,modified");
    apic_get_token()
    .then(post_aci_object_via_jquery(bd_object))
    .then(post_aci_object_via_jquery(epg_object))
    .then(location.reload());
});
With both POSTS completed then it reloads the browser page to update the table.
If you have not opened the browser window to the URL of the running app, you can open the browser window with the url: https://10.0.226.241:10004 that will bring the javascript application that is running from the npm run command.
There click on the menu item Create Network on the left. The window should look similar to the following:
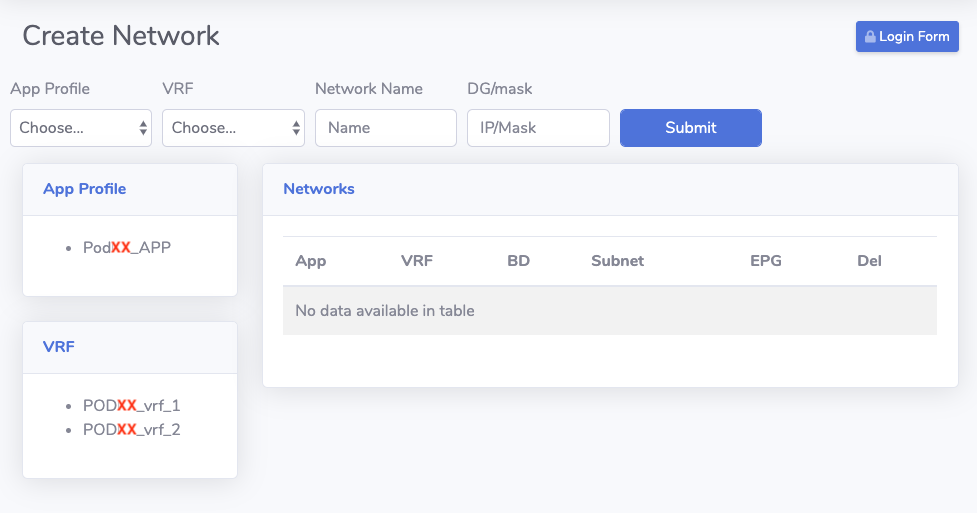
Enter the following information into the form and press Submit
Once finished the page will reload and you should see an updated list of networks. You can add and delete as needed.