JavaScript is currently the most common cross-platform programming language in the world. It's so ubiquitous many libraries have been written over the years to assist programmers in dealing with many of its little quirks. One such library is jQuery, which is extremely popular. You may have also heard of libraries such as ReactJS and AngularJS. These libraries continue to grow in popularity and provide a solid framework for JavaScript application development.
For this lab, jQuery will be used to perform the REST API calls to the ACI Fabric. JSON (JavaScript Object Notation) has become the standard way to serialize and stream structured data between endpoints. As seen in the Python section, ACI can provide data in the form of JSON, which is used heavily in JavaScript.
Make sure you are still in the same directory from the previous section
~/jsapps/ep-viewer.
We have provided you a pre-determined directory structure for you. In here we have created
some files in JavaScript and CSS files for this lab.
You can write JavaScript code directly into an HTML page via the <script>
tag. However, it's more common to reference the script's location either served
locally or remotely in the case of a CDN (Content Delivery Network). Depending
on the requirements of your application it might be more useful to serve the
files locally, as we'll see later in the Apps section.
Edit the index.html file to read the library from the directory of the application. Modify the file to import the JavaScript libraries into our HTML page.
<!DOCTYPE html>
<html>
  <head>
  </head>
  <body>
    <h1>Hello World!</h1>
    <script src="js/jquery-3.2.1.min.js"></script>
    <script src="js/index.js"></script>
  </body>
</html>
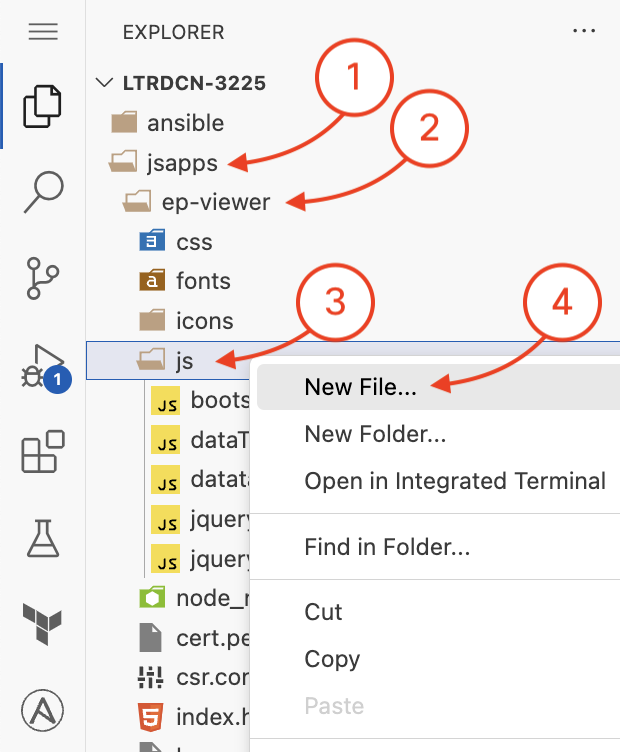
Create a file with the name index.js in the js directory. Similar to
how index.html is the entry point into our web page,
index.js is the entry point into our JavaScript web application.
As done previously with Python, build a JavaScript object containing the values needed to authenticate to the ACI APIC controller.
var creds = {
  url: 'https://10.0.226.41',
  name: 'aciproglab04',
  pwd: 'cisco.123'
}
Storing authentication credentials within client-side code is UNSECURE and NOT RECOMMENDED. This is only done for the purposes of simplification within the lab. A normal application would handle this in a secure way, such as having a form to get the URL, username and password.
jQuery library calls are often made using the $ character.
The $.ajax function below invokes an asynchronous AJAX request
to POST our login credentials to the APIC. This function will be used to perform
many requests against the ACI fabric, including retriving data with an HTTP GET request.
The login()function will make a POST request to
the ACI fabric, with the credentials sent in the data of the request. You can see the type of
the request in type: 'POST'.
var creds = {
  url: 'https://10.0.226.41',
  name: 'aciproglab04',
  pwd: 'cisco.123'
}

function login() {
  return $.ajax({
    type: 'POST',
Add the URL where the AJAX request will be sent.
var creds = {
  url: 'https://10.0.226.41',
  name: 'aciproglab04',
  pwd: 'cisco.123'
}

function login() {
  return $.ajax({
    type: 'POST',
    url: creds.url + '/api/aaaLogin.json?gui-token-request=yes',
Finally, add the data section of the request, containing the data
from the cred data structure to authenticate.
var creds = {
  url: 'https://10.0.226.41',
  name: 'aciproglab04',
  pwd: 'cisco.123'
}

function login() {
  return $.ajax({
    type: 'POST',
    url: creds.url + '/api/aaaLogin.json?gui-token-request=yes',
    data: JSON.stringify({
      aaaUser: {
        attributes: {
          name: creds.name,
          pwd: creds.pwd
        }
      }
    }),
  });
};
When a web page loads, the browser (client) makes various network requests for data as defined in the HTML markup. When working with many sources, the page resources don't load serially, instead loading into the browser at different times.
One problem with JavaScript is making sure all of the code will execute at the right time, instead of executing before the resources have finished loading. In the world of multiple cloud providers, applications can pull content from various sources creating a problem of differing resource availability and load times.
For this reason, jQuery incorporates a function known as document.ready(). This function
makes sure the web page document object model (DOM) is loaded and ready to be used, which helps make sure your code
is executed at the right time.
How does this work? Only after the page has finished loading, the
$(document).ready(function(){}) function is invoked. The logic
to execute is written inside this function, and you can think of it as similar
to a main() function from other languages.
For our application, create a function which calls login() and
then retrieves the authentication token from the login call.
var creds = {
  url: 'https://10.0.226.41',
  name: 'aciproglab04',
  pwd: 'cisco.123'
}

function login() {
  return $.ajax({
    type: 'POST',
    url: creds.url + '/api/aaaLogin.json?gui-token-request=yes',
    data: JSON.stringify({
      aaaUser: {
        attributes: {
          name: creds.name,
          pwd: creds.pwd
        }
      }
    }),
  });
};

$( document ).ready(function() {
  login().then(function (data) {   // this function executes AFTER login() is done
    var attrs = data['imdata'][0]['aaaLogin']['attributes'];  // extract attributes from returned data
    console.log("token=" + attrs['token']);                   // and print to the console
    console.log("urlToken=" + attrs['urlToken']);
  });
});
In your Hello World tab (or browser), open the Chrome Developer Tools in the browser by Right-clicking on the
page and selecting Inspect OR use the CTRL+SHIFT+I keyboard combination.
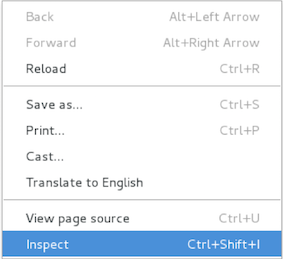
This will bring up with Chrome Developer Tools within the browser. Go to the Console
tab, click the page reload in the browser and
we should see the token and urlToken being printed.

In the previous example, both access tokens were sent to the JavaScript console log for viewing.
However, these will be required for future REST calls to the ACI fabric. Let's
store the tokens in the creds object for future use.
Update the creds data structure with placeholder/default values. Do not forget to add the comma onn line
4 after the password.
var creds = {
  url: 'https://10.0.226.41',
  name: 'aciproglab04',
  pwd: 'cisco.123',
  token: '',
  urlToken: ''
}

function login() {
  return $.ajax({
    type: 'POST',
    url: creds.url + '/api/aaaLogin.json?gui-token-request=yes',
    data: JSON.stringify({
      aaaUser: {
        attributes: {
          name: creds.name,
          pwd: creds.pwd
        }
      }
    }),
  });
};

$( document ).ready(function() {
  login().then(function (data) {
    var attrs = data['imdata'][0]['aaaLogin']['attributes'];
    console.log("token=" + attrs['token']);
    console.log("urlToken=" + attrs['urlToken']);
  });
});
Next, modify the callback function (which is passed to then()) to
set the tokens in the creds object after the login()
call has finished.
var creds = {
  url: 'https://10.0.226.41',
  name: 'aciproglab04',
  pwd: 'cisco.123',
  token: '',
  urlToken: ''
}

function login() {
  return $.ajax({
    type: 'POST',
    url: creds.url + '/api/aaaLogin.json?gui-token-request=yes',
    data: JSON.stringify({
      aaaUser: {
        attributes: {
          name: creds.name,
          pwd: creds.pwd
        }
      }
    }),
  });
};

$( document ).ready(function() {
  login().then(function (data) {
    var attrs = data['imdata'][0]['aaaLogin']['attributes'];
    creds.token = attrs['token'];
    creds.urlToken = attrs['urlToken'];
  });
});
Once you save the document you will notice that the browser window automatically reloaded. This is intended and part of the functionality of npm lite-server.
A little better explanation of what was just done with the .then() function.
When you are using a web browser, the browser code is optimized for speed. To accomplish this, the architecture of the code is heavily parallel in nature. When the browser reads the HTML code and finds a reference for something to download from the server it starts a process to request this data and continues.
This is an area that confuses people when they have been working in Python (that is very much serial in nature ) and then are working with JavaScript. So think about it as this: do this and when you are done with that operation then do this.
To handle this, one mechanism is the .then() functionality (known as promises) that what it does is tell
JavaScript to do something and then do something else. In this case we are telling JavaScript
to go fetch the data from the ACI Interface API and when that returns the data to process it
and save the token data. For more information you can reference
this
guide from Google
or this guide from
Mozilla.
It is very common for new JavaScript developers to run into this problem and not understand what is going on.