Under the majority of the role directories you'll notice a ".yml" file. Playbooks are written in a very simple markup language called YAML, which stands for Yet Another Markup Language. YAML is used as it's even easier to read than data structure formats such as XML or JSON.
YAML files optionally begin with --- at the top of the file to signify the start of the file. Following the file start, comes the Ansible modules written in YAML syntax. YAML syntax for Ansible modules are expressed as a list of key/value pairs. Below you can see an example of YAML syntax that contains a list of dictionaries and where the dictionaries contain lists:
- name: CREATE ACI TENANT
  cisco.aci.aci_tenant:
    tenant: "My_Tenant"
    descr: "This Tenant is for testing only"
    host: "x.x.x.x"
    username: "admin"
    password: "superpass"
    validate_certs: false
As you can see the first thing, we are doing is to introduce you is to an specific ansible module. In this case the
aci_tenant is an ansible module. There are many ansible modules available and more added with each
release.
Keep the reference to the
ACI documentation for Ansible saved.
Also the link for
modules
is available. Just click on the link and then click on content button.
An important key to any programing language are variables and Ansible is no different. If you would have had to create 100 tenants in an ACI fabric, you dont want to have to create 100 different YAML files with the configuration that we showed above. That makes no sense.
Ansible allows the placement of variables in the YAML file via what we know as templates. This template system is called Jinja Templates and is used in many aspects of Python, the core base of Ansible. This is how the syntax would be like for the example above:
- name: CREATE ACI TENANT
  cisco.aci.aci_tenant:
    tenant: "{{ tenant_name }}"
    descr: "{{ descr }}"
    host: "{{ inventory_hostname }}"
    username: "{{ username }}"
    password: "{{ password }}"
    validate_certs: false
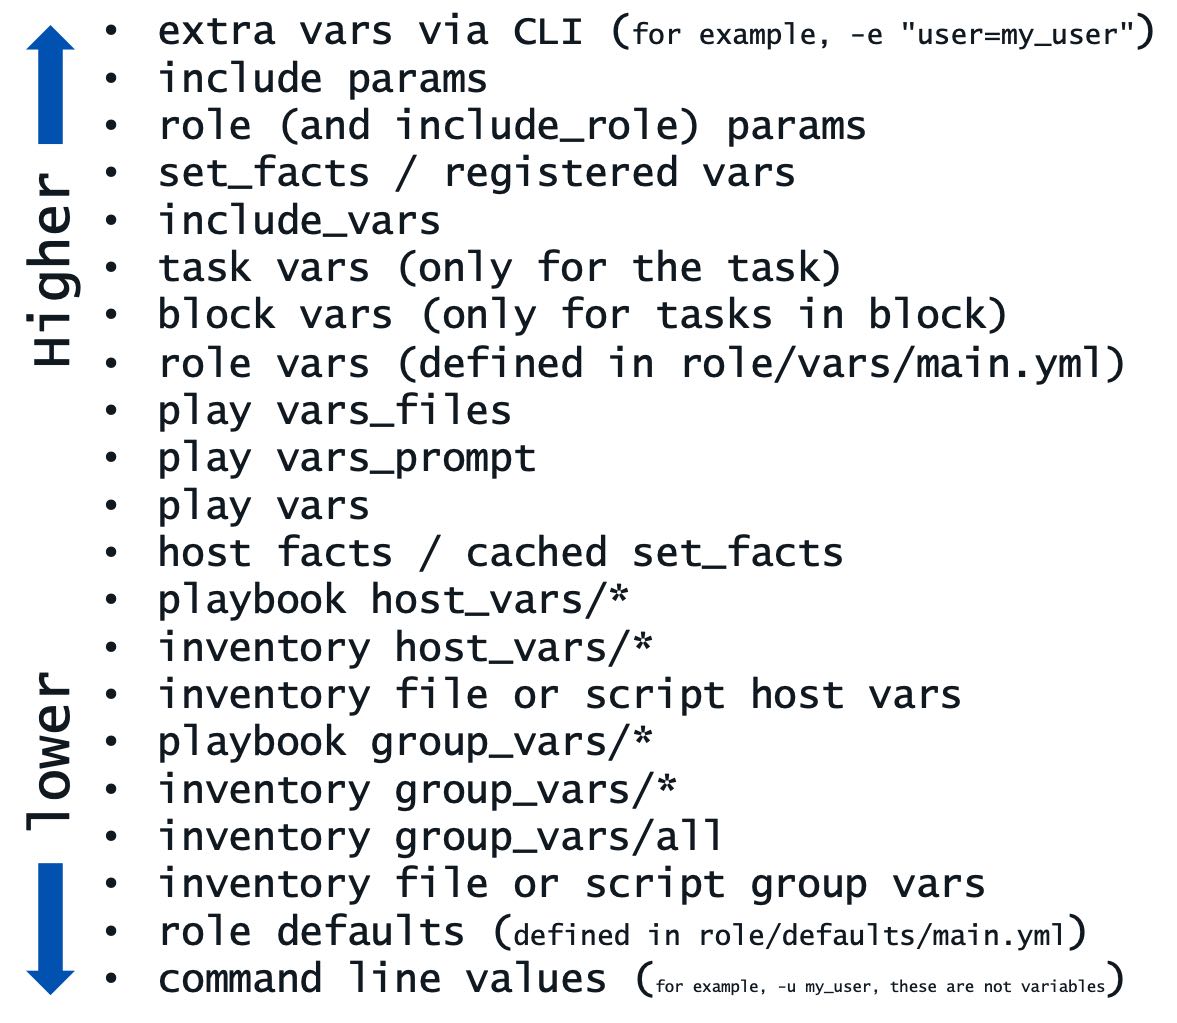
Variables can be defined in various locations and Ansible has a precedence system for understanding what and when a variable would be overridden if used in more than one location. The precedence for a variable can be seen below. As an example, a variable in the role defaults directory would be overridden by a variable in the playbook global_vars/all directory and file. Further, both of these are overridden by the local vars directory within the specific role, role vars.
We will be showing you a capability called module_defaults that will allow us to configure the authentication and connection elements needed for each module in a central location to simplify the structure of the tasks.
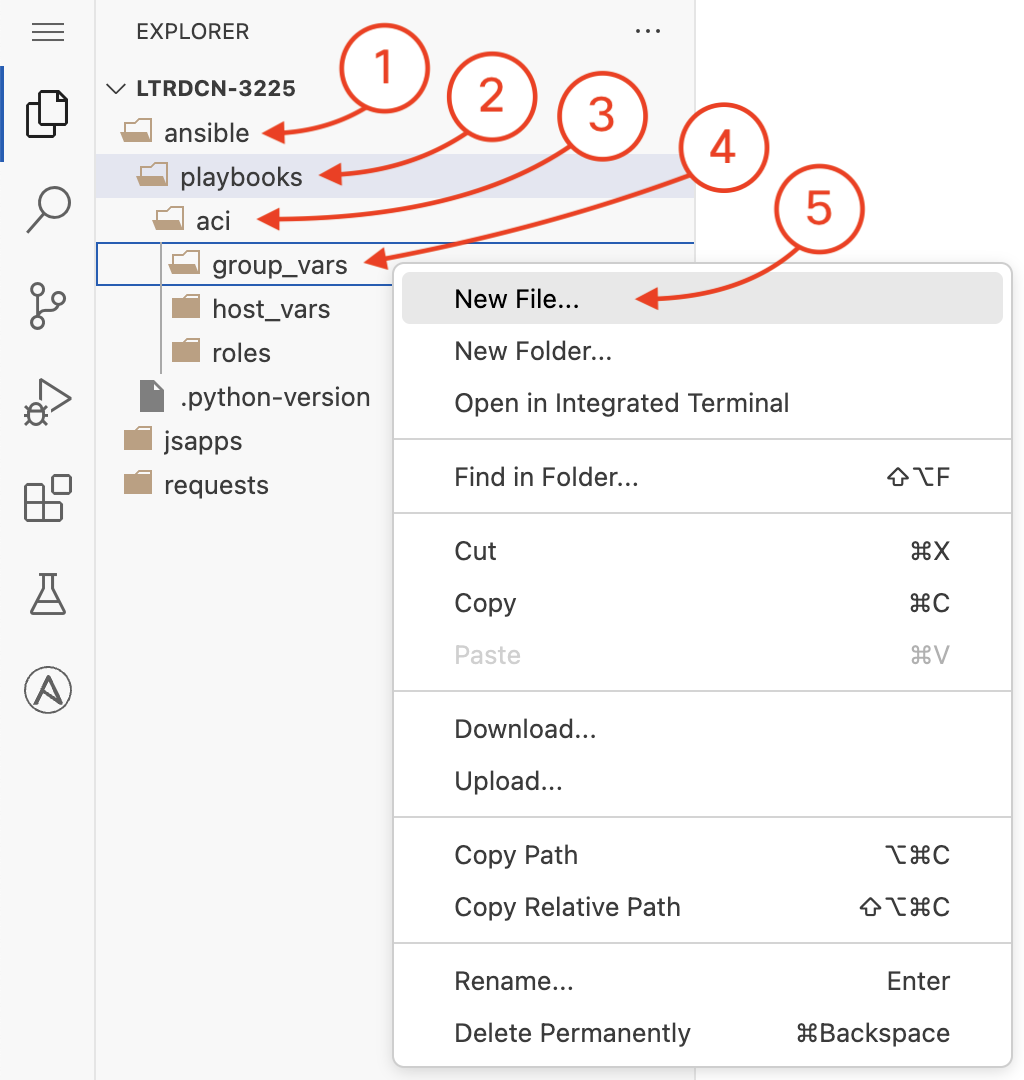
You are now going to create a new file in the group_vars directory under the
playbook/aci
directory. You will be doing this in the Visual Studio Code (VSC) editor. Right click on the
editor left pane where the group_vars directory is and then click on New File
to create the all.yml file in group_vars
and populate the contents of the file
for the ansible_connection, username, password, and
protocol to be
used in the ACI tasks.
group_vars/all is where you place universal variables that apply for all devices.
This new file will be called all.yml
The ansible_connection variable is used to define the connection type to the device. For
this lab, you will be using the local connection type, which means that Ansible will be
executing the tasks locally on the device where Ansible is installed.
---
ansible_connection: local
username: aciproglab50
password: cisco.123
The device specific variables can be defined under the host_vars directory for each device.
For this lab you are going to be leveraging a specific user that has write permissions for a specific tenant. For this reason we have created the Tenant for you. The ACI Tenant provides a user space domain for creating network elements and is controlled via RBAC.
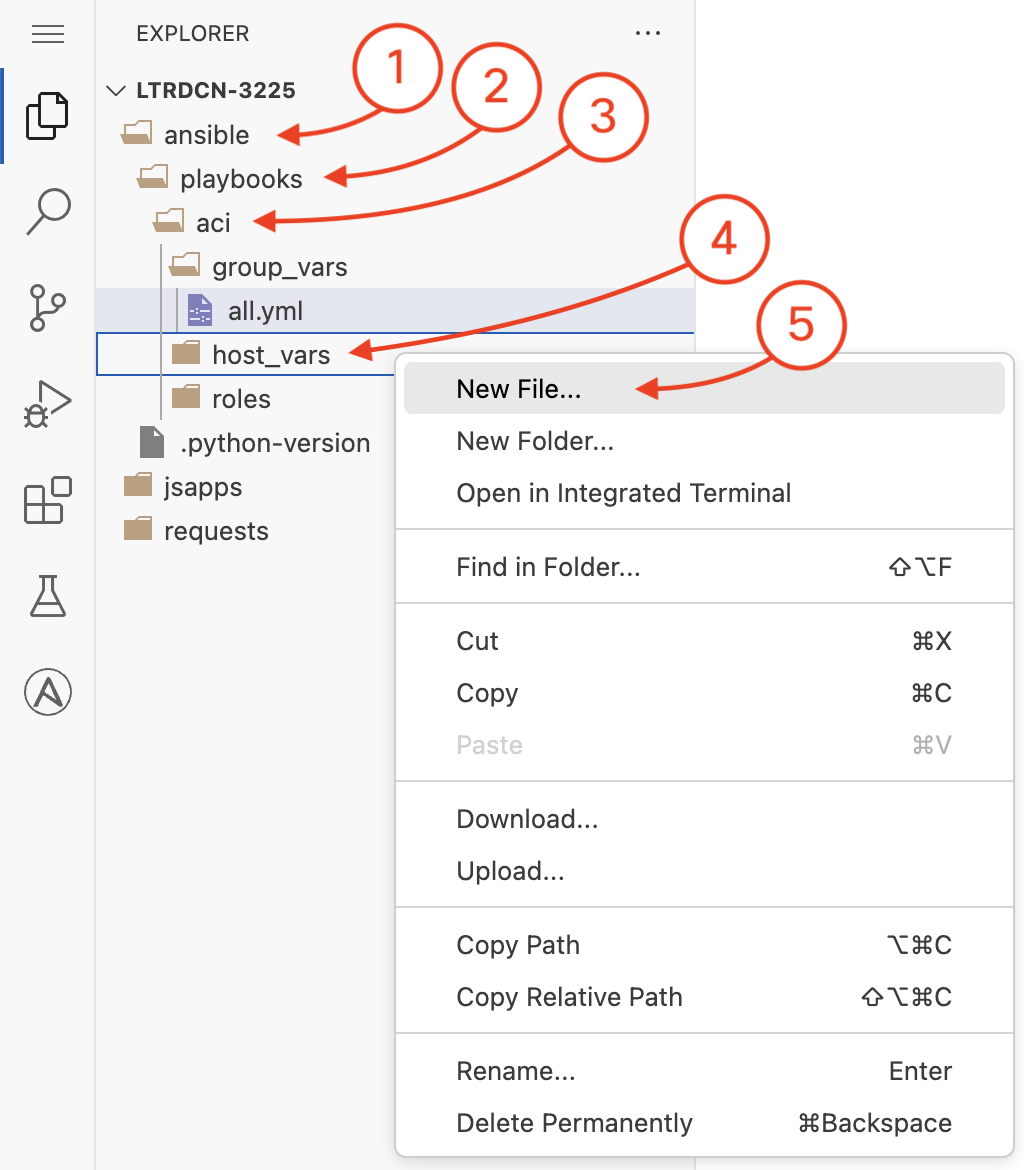
You are now going to create a new file in the host_vars directory under the
playbook/aci
directory. Like before, you will do this in the Visual Studio Code (VSC) editor. Right click on the
editor left pane where the host_vars directory is and then click on New File
to create the apic.yml file in host_vars
and populate the contents of the file
with the data that will be used in your Ansible tasks that will be defined next.
host_vars/apic.yml is where you place variables that apply to your intended configuration state.
If you had variable data that is the for your tasks no matter what, then you could define that directly in
your roles/vars/main.yml.
Again, this new file will be called apic.yml
Inset the variables for your tenant, VRFs, and application profile after the
# vars file for apic
comment:
---
tenants:
  - name: aciproglab50
    vrfs:
      - name: POD50_vrf_1
        bridge_domains:
          - name: web
            description: POD50 Web front end Bridge Domain
            subnet:
              name: POD50_web_subnet
              description: POD50 Subnet for Web front end
              gateway: 10.100.50.1
              mask: 24
          - name: database
            description: POD50 Database Bridge Domain
            subnet:
              name: POD50_db_subnet
              description: POD50 Subnet for Database Bridge Domain
              gateway: 10.100.150.1
              mask: 24
      - name: POD50_vrf_2
    app_profiles:
      - name: POD50_APP
        description: POD50 Application Profile
        endpoint_groups:
          - name: web
            bd: web
            description: POD50 WEB EPG
          - name: database
            bd: database
            description: POD50 Database EPG
The Ansible documentation for each network module provides a synopsis of what function the module performs and a table of parameters or keys. The tabulated parameters inform the user which parameters are required for the module to function as a task, which parameters are optional, and what the defaults are for parameters. There are many network modules that exist to configure Tenants, VRFs, BDs, APs, EPGs, Contracts, etc. Some of the modules that are available and the ones you will use today are the following:
aci_vrfaci_bdaci_apaci_epg
Cisco is commited to Ansible and continues to expand the library with new modules in the pursuit
of having 100% correlation between the module and ACI capabilities. In a place where an Ansible module is
not available, Cisco has developed a specific module that allows you to send specific ACI configuration objects into
the fabric
via the REST interface called aci_rest.
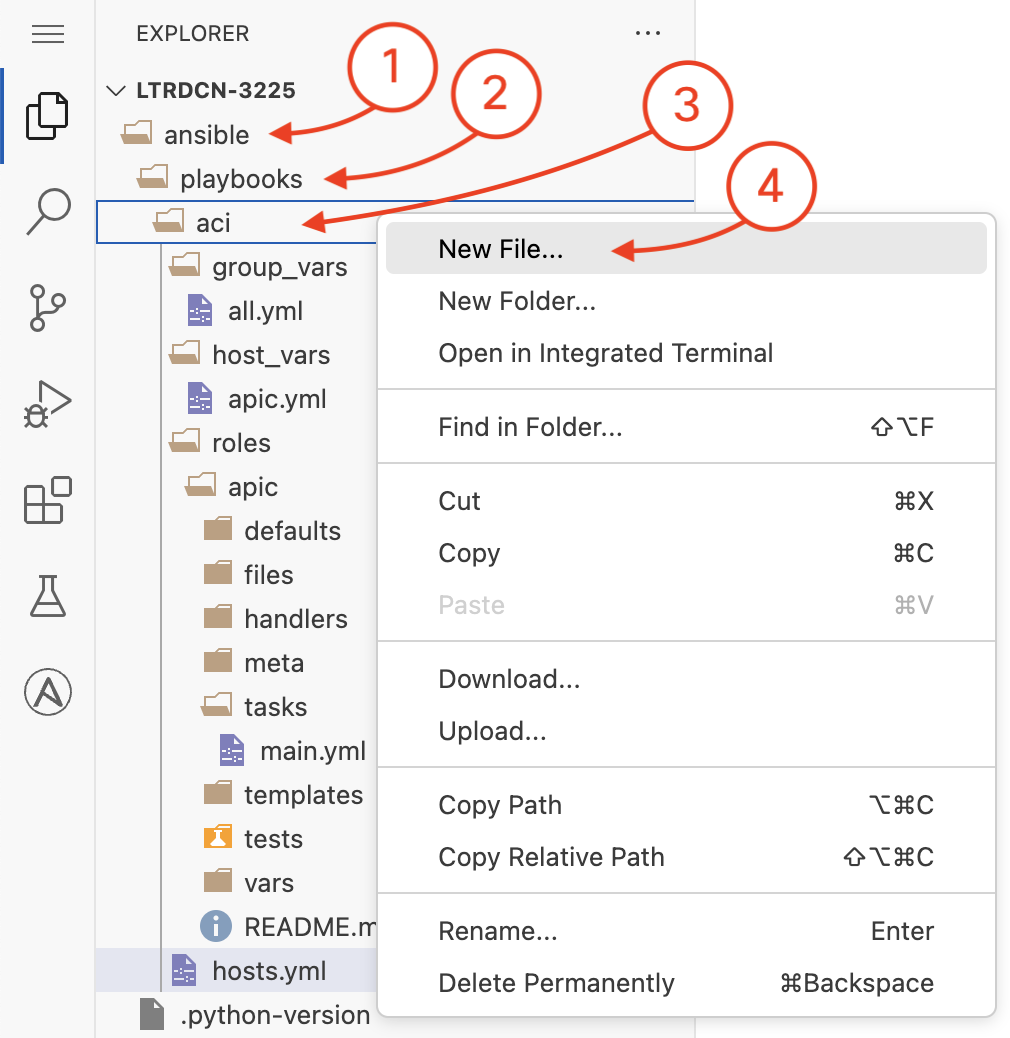
In the editor find the file main.yml under the roles/apic/tasks directory and open it by
double-clicking on it.
You will be adding the following Ansible tasks using the beforementioned modules in YAML format after the
# tasks file for apic comment.
You are also going to make use of Ansible loop constructs to iterate over the tenants, VRFs, and bridge domains
along with Ansible filters to work with complex data structures.
The subelements filter is used to iterate over the tenants and VRFs and the from_yaml
filter is used to convert the YAML data structure into a list of dictionaries.
Additionally, you are going to leverage inline Jinja templating to generate simpler data structures from your complex defined configuratoin data structure.
Pay attention to the line numbers as they should match with your editor.
- name: CREATE ACI TENANT VRF(S)
  cisco.aci.aci_vrf:
    tenant: "{{ item.0.name }}"
    vrf: "{{ item.1.name }}"
    state: present
  delegate_to: localhost
  loop: "{{ tenants | subelements('vrfs') }}"
  loop_control:
    loop_var: item

- name: GENERATE BRIDGE DOMAIN(S)
  ansible.builtin.set_fact:
    bridge_domains: "{{ _bridge_domains | ansible.builtin.from_yaml }}"
  vars:
    _bridge_domains: |-
      {% for tenant in tenants | default([]) %}
      {% for vrf in tenant.vrfs | default([]) %}
      {% for bd in vrf.bridge_domains | default([]) %}
      - tenant: {{ tenant.name }}
        vrf: {{ vrf.name }}
        bd:
          name: {{ bd.name }}
          desc: {{ bd.description }}
          subnet:
            name: {{ bd.subnet.name }}
            desc: {{ bd.subnet.description }}
            gateway: {{ bd.subnet.gateway }}
            mask: {{ bd.subnet.mask }}
      {% endfor %}
      {% endfor %}
      {% endfor %}

- name: CREATE BRIDGE DOMAIN(S)
  cisco.aci.aci_bd:
    tenant: "{{ item.tenant }}"
    vrf: "{{ item.vrf }}"
    bd: "{{ item.bd.name }}"
    description: "{{ item.bd.desc }}"
    state: present
  delegate_to: localhost
  loop: "{{ bridge_domains }}"

- name: CREATE SUBNET(S) FOR BRIDGE DOMAIN(S)
  cisco.aci.aci_bd_subnet:
    tenant: "{{ item.tenant }}"
    bd: "{{ item.bd.name }}"
    subnet_name: "{{ item.bd.subnet.name }}"
    description: "{{ item.bd.subnet.desc }}"
    gateway: "{{ item.bd.subnet.gateway }}"
    mask: "{{ item.bd.subnet.mask }}"
    scope: private
    state: present
  delegate_to: localhost
  loop: "{{ bridge_domains }}"
In the editor, under the same file you will be adding the following modules.
- name: CREATE TENANT APPLICATION PROFILE(S)
  cisco.aci.aci_ap:
    tenant: "{{ item.0.name }}"
    ap: "{{ item.1.name }}"
    description: "{{ item.1.description }}"
    state: present
  delegate_to: localhost
  loop: "{{ tenants | subelements('app_profiles') }}"
  loop_control:
    loop_var: item

- name: GENERATE ENDPOINT GROUP(S)
  ansible.builtin.set_fact:
    epgs: "{{ _epgs | ansible.builtin.from_yaml }}"
  vars:
    _epgs: |-
      {% for tenant in tenants | default([]) %}
      {% for app_profile in tenant.app_profiles | default([]) %}
      {% for epg in app_profile.endpoint_groups | default([]) %}
      - tenant: {{ tenant.name }}
        ap: "{{ app_profile.name }}"
        bd: "{{ epg.bd }}"
        epg: "{{ epg.name }}"
        desc: {{ epg.description }}
      {% endfor %}
      {% endfor %}
      {% endfor %}

- name: CREATE EPG(S)
  cisco.aci.aci_epg:
    tenant: "{{ item.tenant }}"
    ap: "{{ item.ap }}"
    bd: "{{ item.bd }}"
    epg: "{{ item.epg }}"
    description: "{{ item.desc }}"
    state: present
  delegate_to: localhost
  loop: "{{ epgs }}"
Ansible refers to its host file as an inventory file. The inventory file has a default location in
/etc/ansible/hosts, but can also be specified directly within a playbook locally and used with the
-i hosts.yml option, where hosts happens to be in the inventory file name. Within the inventory file,
you can simply list all the devices/hosts or make use of group names using brackets which classifies
devices you are controlling at what times and for what purpose.

The host file will be created in the location ~/ltrdcn-3225/ansible/playbooks/aci. Please
goto this location and create the file hosts.yml.
# hosts file for Ansible playbook
---
all:
  children:
    aci:
      hosts:
        apic:
          ansible_host: 10.0.226.43
As previously mentioned, Ansible calls its configuration and orchestration framework "playbooks" and is a collections of "play(s)" or tasks for configuration management and deployment to a device or multiple devices. While playbooks can be represented as a single file, Ansible best practices recommend a particular directory structure for playbooks that you built using roles for better organization and reuse. You built all of this over the last three sections. You now need to build the main playbook file, which would look like the below:
The below playbook file you will use for this lab designates the following behaviors, for each role ‘x’:
Ansible allows you to define default values for modules in the playbooks. This is done by defining a
module_defaults section in the playbook. The module_defaults section is a dictionary
that contains key/value pairs for the default values of the modules. Cisco has introduced in latest versions
of Ansible the capability to define the default values for the ACI modules.
This capability simplifies the playbook structure and makes it more readable since it avoids the repetition in the definition of the variables for each module. Here we will define the default values needed to authenticate to the APIC, for which Ansible will pass these defaults to each task that under the roles.
The host file will be created in the location ~/ltrdcn-3225/ansible/playbooks/aci. Please
goto this location and create the file site.yml and add the following content.
---
# main playbook
- name: APIC Tenant Configuration playbook
  hosts: apic
  gather_facts: false
  module_defaults:
    group/cisco.aci.all:
      hostname: "{{ansible_host}}"
      username: "{{ username }}"
      password: "{{ password }}"
      validate_certs: false
      use_ssl: true
  roles:
    - role: apic
Now we can proceed to execute the ansible playbooks.