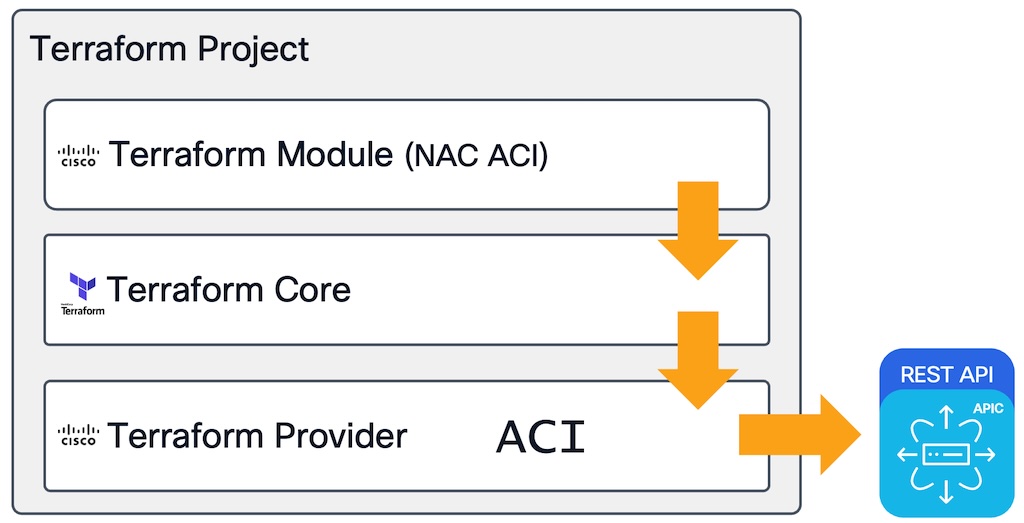
Terraform has various components. The first to understand is the provider. The provider is the component that allows Terraform to interact with the network device. In this case, we will use the ACI provider. The ACI provider is available on Cisco DevNet and is automatically installed by Terraform when you initialize the Terraform project. The terraform provider is utilize by Terraform Core. So think of the provider as the driver that allows Terraform to interact with the network device. Cisco has developed various providers for different platforms, such as ACI, Nexus Dashboard, and SD-WAN Manager.
The terraform module is the component that is the core of the NetAsCode framework. The module
is written in Hashicorp configuration language (HCL) and is used to process the data
into the specific resources part of the provider. For ACI we utilize only a single
resource, the aci_rest_managed resource. For other platforms such
as NXOS we utilize many different resources.
For each of the technologies that NetAsCode supports, there is a repository that contains example data models that can be used to get started with the technology. In this example we are using what is called the aci-simple-example repository which works best for this lab. The first step will be to clone the repository from this public GitHub location available to everyone.
cd ~/ltrdcn-3225
git clone https://github.com/netascode/nac-aci-simple-example.git ~/ltrdcn-3225/netascode
First we will remove the .git folder from the repository. This is because we want to use this as a starting point for the lab and we don't want to have any issues with the git repository. This will also allow us to initialize our own git repository.
rm -rf ~/ltrdcn-3225/netascode/.git
We also remove the tenant_DEV.nac.yaml file that is in the repository. This is because we will
create our own tenant data model file pertinent for the lab. And then we will create a new file
called tenant_15.nac.yaml that will be the new data file.
rm -f ~/ltrdcn-3225/netascode/data/tenant_DEV.nac.yaml
cat << EOF > ~/ltrdcn-3225/netascode/data/tenant_15.nac.yaml
---
apic:
  tenants:
EOF
In this repository the main.tf file is already configured to use the ACI provider. This
is defined by the section inside of the file that starts with provider "aci".
In that section you will see the definition of the APIC IP address, username, and password.
Usually these are not embedded in the file itself and are instead provided as environment variables
as adding credentials into a GIT reposistory is a horrible idea. These also can be stored
in Vaults or other secure storage methods.
For this lab we will focus on expressing the simplicity instead of talking about vaults and other methods of securing credentials.
In the IDE open the file ~/ltrdcn-3225/netascode/main.tf and
update the provider "aci" section to use the variables that are defined below.
code-server ~/ltrdcn-3225/netascode/main.tf
terraform {
  required_providers {
    aci = {
      source = "CiscoDevNet/aci"
    }
  }
}

provider "aci" {
  username = "admin"
  password = "cisco.123"
  url      = "https://10.0.226.41"
}

module "aci" {
  source  = "netascode/nac-aci/aci"
  version = "1.2.0"

  yaml_directories = ["data"]

  manage_access_policies    = false
  manage_fabric_policies    = false
  manage_pod_policies       = false
  manage_node_policies      = false
  manage_interface_policies = false
  manage_tenants            = true
  managed_tenants           = ["tfacipod15"]
}
With this configuration we are telling Terraform to use the provider and defined modules. These
modules are then installed during the initialization process. Also by definining the manage
variables we are telling Terraform what aspects we plan to configure. This granular control
allows you to control automation in specific areas of the ACI fabric, which might be apealing
as a method to start with NetAsCode in just parts of your overall fabric configuration.
The data model is the core of NetAsCode. The data model is a YAML file that contains the configuration of the ACI fabric. The data model definition can be observed in the site NetAsCode ACI documentation.
The data model is a tree structure with apic as the top of the tree. In the website
you can see the definition for each of the elements of the tree with an explanation of the
parameters available. Each also contains an example. The following is what the
example for a tenant looks like. Obviously this is just the top level.
apic:
  tenants:
    - name: ABC
      alias: ABC-ALIAS
      description: My Description
      security_domains:
        - SECURITY-DOMAIN1
As you add more elements to the tree, you will see that the structure is very similar to the structure of the ACI fabric. This is because the data model is designed to be a representation of the ACI fabric. This allows you to easily understand the data model and how it relates to the ACI fabric. The data model is also designed to be extensible, so you can add your own elements to the data model as needed. This allows you to customize the data model to fit your needs.
In the following example we see the tenant and a definition of a bridge domain.
apic:
  tenants:
    - name: ABC
      bridge_domains:
        - name: BD1
          alias: ABC_BD1
          mac: 00:22:BD:F8:19:FE
          virtual_mac: 00:23:BD:F8:19:12
          ep_move_detection: true
          arp_flooding: false
          ip_dataplane_learning: false
          limit_ip_learn_to_subnets: false
          multi_destination_flooding: encap-flood
For this lab we will be creating a simple structure to represent the value of NetAsCode. Using NetAsCode you can create as many files as you wish to split the configuration into smaller files representing different parts of the ACI fabric.
In this step we will modify the data model to create a tenant with a VRF and a bridge domain.
code-server ~/ltrdcn-3225/netascode/data/tenant_15.nac.yaml
When you open the file, you wil be adding tenants. In YAML when you are going to add a
list item you need to add a dash - before the item. In this case you
will be adding a tenant with the name tfacipod15. This will be
represented by the dash and then the parameter name as the first line of the
object tenant.
---
apic:
  tenants:
    - name: tfacipod15
Then you will add three VRFs to this tenant. Under the parameter vrfs you will
add a list. Each list item will be the definition of the VRF parameters.
---
apic:
  tenants:
    - name: tfacipod15
      vrfs:
        - name: tf_pod15_vrf_1
          description: POD15 VRF 1 Example for Cisco Live
        - name: tf_pod15_vrf_2
          description: POD15 VRF 2 Example for Cisco Live
        - name: tf_pod15_vrf_3
          description: POD15 VRF 3 Example for Cisco Live
Then you will add the bridge domains. The bridge domains are added under the bridge_domains
parameter. Each bridge domain also contains a list of subnets.
---
apic:
  tenants:
    - name: tfacipod15
      vrfs:
        - name: tf_pod15_vrf_1
          description: POD15 VRF 1 Example for Cisco Live
        - name: tf_pod15_vrf_2
          description: POD15 VRF 2 Example for Cisco Live
        - name: tf_pod15_vrf_3
          description: POD15 VRF 3 Example for Cisco Live
      bridge_domains:
        - name: pod15_bd_1
          vrf: POD15_vrf_1
          subnets:
            - ip: 1.1.1.1/24
              public: true
        - name: pod15_bd_2
          vrf: POD15_vrf_1
          subnets:
            - ip: 1.1.2.1/24
              public: true
        - name: pod15_bd_3
          vrf: POD15_vrf_2
          subnets:
            - ip: 1.1.3.1/24
              public: true
        - name: pod15_bd_4
          vrf: POD15_vrf_3
          subnets:
            - ip: 1.1.4.1/24
              public: true
Before we can run Terraform, we need to initialize the Terraform project. This will download the
required providers and modules. This is done by running the terraform init command.
cd ~/ltrdcn-3225/netascode
terraform init
You should see output similar to the following:
Initializing the backend...
Initializing modules...
Downloading registry.terraform.io/netascode/nac-aci/aci 1.2.0 for aci...
- aci in .terraform/modules/aci
- aci.aci_aaa in .terraform/modules/aci/modules/terraform-aci-aaa
[CUT]
Initializing provider plugins...
- terraform.io/builtin/terraform is built in to Terraform
- Finding hashicorp/local versions matching ">= 2.3.0"...
- Finding ciscodevnet/aci versions matching ">= 2.0.0, >= 2.15.0, 2.15.0"...
- Finding netascode/utils versions matching ">= 1.0.2"...
- Installing ciscodevnet/aci v2.15.0...
- Installed ciscodevnet/aci v2.15.0 (signed by a HashiCorp partner, key ID 433649E2C56309DE)
- Installing netascode/utils v1.0.2...
- Installed netascode/utils v1.0.2 (self-signed, key ID 48630DA58CAFD6C0)
- Installing hashicorp/local v2.5.3...
- Installed hashicorp/local v2.5.3 (signed by HashiCorp)
Partner and community providers are signed by their developers.
If you'd like to know more about provider signing, you can read about it here:
https://developer.hashicorp.com/terraform/cli/plugins/signing
Terraform has created a lock file .terraform.lock.hcl to record the provider
selections it made above. Include this file in your version control repository
so that Terraform can guarantee to make the same selections by default when
you run "terraform init" in the future.

Terraform has been successfully initialized!

You may now begin working with Terraform. Try running "terraform plan" to see
any changes that are required for your infrastructure. All Terraform commands
should now work.

If you ever set or change modules or backend configuration for Terraform,
rerun this command to reinitialize your working directory. If you forget, other
commands will detect it and remind you to do so if necessary.
The next step is to run the terraform plan command. This will show you what changes
Terraform will make to the ACI fabric based on the data model you have defined. This is a
very important step as it allows you to review the changes before they are applied to the ACI fabric.
Plan will correlate the data model with the current state of the ACI fabric. It does this by comparing the data model with the current state of the ACI fabric. Terraform compares the intended state with the API of the APIC controller, checking every parameter. The value of this check is that in large scale deployments Terraform will quickly identify what is changed and what is not.
cd ~/ltrdcn-3225/netascode
terraform plan
Terraform used the selected providers to generate the following execution plan. Resource actions are indicated with the following symbols:
  + create

Terraform will perform the following actions:
[CUT]
Plan: 29 to add, 0 to change, 0 to destroy.
What that is telling you is that Terraform will create 29 resources based on the data model you have defined.
The final step is to run the terraform apply command. This will apply the changes
to the ACI fabric based on the data we have structured for NetAsCode.
Terraform will iterate over the data to create all the resources required to push the configuration into the ACI fabric.
You will be prompted to confirm the changes before they are applied. Type yes to confirm.
cd ~/ltrdcn-3225/netascode
terraform apply
After Terraform completes, you can see the changes in the ACI fabric under the tenant [https://10.0.226.41/].
Now that we have created the resources, we can also remove them. This is done by simply removing the
resource from the data model and then running terraform apply again.
Terraform will then remove the resource from the ACI fabric.
This is one of the biggest differences between Ansible and Terraform. In Ansible you have to
define the action to take, such as present and absent. In Terraform you simply
remove the resource. This is possible because of Terraform state. When terraform does its plan to
what to change, it would see that the inbound declared configuration doesn't have the deleted
component but the state file does. From there it now knows that it must remove the resource
from the infrastructure and from state.
In the below code, delete the lines highlighted.
---
apic:
  tenants:
    - name: tfacipod15
      vrfs:
        - name: tf_pod15_vrf_1
          description: POD15 VRF 1 Example for Cisco Live
        - name: tf_pod15_vrf_2
          description: POD15 VRF 2 Example for Cisco Live
        - name: tf_pod15_vrf_3
          description: POD15 VRF 3 Example for Cisco Live
      bridge_domains:
        - name: pod15_bd_1
          vrf: POD15_vrf_1
          subnets:
            - ip: 1.1.1.1/24
              public: true
        - name: pod15_bd_2
          vrf: POD15_vrf_1
          subnets:
            - ip: 1.1.2.1/24
              public: true
        - name: pod15_bd_3
          vrf: POD15_vrf_2
          subnets:
            - ip: 1.1.3.1/24
              public: true
        - name: pod15_bd_4
          vrf: POD15_vrf_3
          subnets:
            - ip: 1.1.4.1/24
              public: true
Once you have removed these lines, run the terraform apply command again.
cd ~/ltrdcn-3225/netascode
terraform apply --auto-approve
You will see that Terraform will remove the resources that you have deleted from the data model. This shows how the declarative nature of Terraform works. Compared to Ansible, where you have to define the action to take, in Terraform you simply remove the resource from the data model and Terraform will assume that because the configuration doesn't exist anymore in the model that it needs to be removed.
module.aci.terraform_data.validation: Refreshing state... [id=2a0d638c-7014-422a-d4f1-92167a17a98e]
module.aci.module.aci_tenant["tfacipod15"].aci_rest_managed.fvTenant: Refreshing state... [id=uni/tn-tfacipod15]
[CUT]
Terraform used the selected providers to generate the following execution plan. Resource actions are indicated with the following symbols:
  - destroy

Terraform will perform the following actions:

  # module.aci.module.aci_bridge_domain["tfacipod15/pod15_bd_4"].aci_rest_managed.fvBD will be destroyed
  # (because module.aci.module.aci_bridge_domain["tfacipod15/pod41_bd_4"] is not in configuration)
  [CUT]
  # module.aci.module.aci_bridge_domain["tfacipod15/pod41_bd_4"].aci_rest_managed.fvRsCtx will be destroyed
  # (because module.aci.module.aci_bridge_domain["tfacipod15/pod41_bd_4"] is not in configuration)
  [CUT]
  # module.aci.module.aci_bridge_domain["tfacipod15/pod41_bd_4"].aci_rest_managed.fvSubnet["1.1.4.1/24"] will be destroyed
  # (because module.aci.module.aci_bridge_domain["tfacipod15/pod41_bd_4"] is not in configuration)
  [CUT]

Apply complete! Resources: 0 added, 0 changed, 8 destroyed.
The power of NetAsCode is that instead of you focusing on building "automation" you focus purely on the definition of the network inside of it's pre-defined data model. This dramatically simplifies automation constructs.
NetAsCode was designed with Infrastructure as Code in mind. It blends perfectly inside an automation pipeline and Terraform provides the capability to scale.
The open source elements of NetAsCode are explained in detail at: NetAsCode Website