In Python you could write the code to interact with the ACI library directly without the need of a library. Yet the advantage of some of these libraries is that another person has provided a foundation that is easier to work with than going at it alone. The Requests Library is a very popular library available in Python that really helps you when doing REST calls using Python.
The best description for Requests is available on their site as: "Requests is the only Non-GMO HTTP library for Python, safe for human consumption."
Change to the top directory to modify your bash resource file.
cd ~
In this lab we have been growing into different concepts. One area that we have been glossing over is security of your credentials. You should never hard code your credentials into your code, and we skipped this in the Ansible section. In this section we will show you how to set your credentials as environment variables. This is a best practice in the industry.
Why use environment variables? For starters is avoids your credentials to exist inside code that could eventualy be stored inside of an SCM like GIT. Removing passwords inside of a source code repository is a complicated task that even seasoned profesionals have a hard time doing. The second part is that it allows for control from pipelines as we saw earlier. Environment variables can be set in the pipeline software allowing for specific control of who can change network devices.
To accelerate the process of setting environment variables, we have created a script that will set the environment variables for you in the profile for the linux shell and then enable the environment variables for the current session.
cat << EOF >> ~/.bashrc

export APIC_USERNAME='aciproglab01'
export APIC_PASSWORD='cisco.123'
export APIC_IP='10.0.226.41'
EOF
Now that you have set the environment variables, you have to enable them for the current session. You can do this by executing the following command:
source ~/.bashrc
As we had mentioned we will be using this web based IDE. You have complete view of the files in the working directory ltrdcn-3225. From here you can create files in the different directories we will create for the different components in the lab.
To create a file you just use the IDE itself.
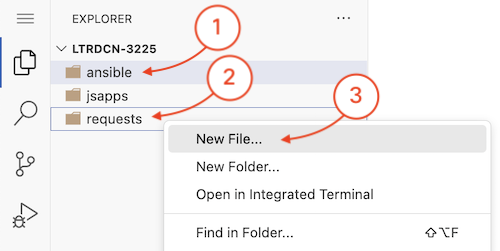
And name the file
aci_auth.py
For our simple request script we are going to just interact directly with the fabric. We have to get the request library imported into our script, and then work with the authentication to the ACI fabric like we did in the Postman section of the lab.
On the first line of aci_auth.py you will add:
import requests, json, os
This will import into our script the request library and the JSON library to be able to construct the ReST API calls to the ACI fabric.
You are going to now create a python function that we will call get_aci_token that will
contain the code to get the token from the APIC controller. This function will be called from the main
part of the script. This is a best practice in programming to have your code in functions that can be
called from the main part of the script. This makes your code more modular and easier to read and
understand.
The first part of the function will be to get the environment variables that we set earlier. This is
done by using the os.environ method that is part of the Python standard library. This
method will return a dictionary of all the environment variables that are set in the current session.
You can then access the environment variables by using the key of the dictionary that is the name of
the environment variable. In this case we are going to get the APIC IP, the APIC username and the
APIC password.
import requests, json, os

def get_aci_token():
    apic_ip = os.environ["APIC_IP"]
    apic_username = os.environ["APIC_USERNAME"]
    apic_password = os.environ["APIC_PASSWORD"]
With thee you will then create a python dictionary that will be the structure that is required for REST request to the APIC in JSON format.
import requests, json, os


def get_aci_token():
    apic_ip = os.environ["APIC_IP"]
    apic_username = os.environ["APIC_USERNAME"]
    apic_password = os.environ["APIC_PASSWORD"]

    credentials = {'aaaUser':
                {'attributes':
                    {'name': apic_username, 'pwd': apic_password }
                }
        }
Now that you have the structure of the authentication request, you have to build the code to send
the request to the APIC controller. The first thing is to set the base URL that we will use to
make the request against the AAA object models of the fabric to gain a authentication token. For better
results we will create two variables. base_url and login_url where we can append to that
base string, base_url, with the specific object we want to reach in the fabric.
If you remember when we talked about the API, you can see the structure was like:
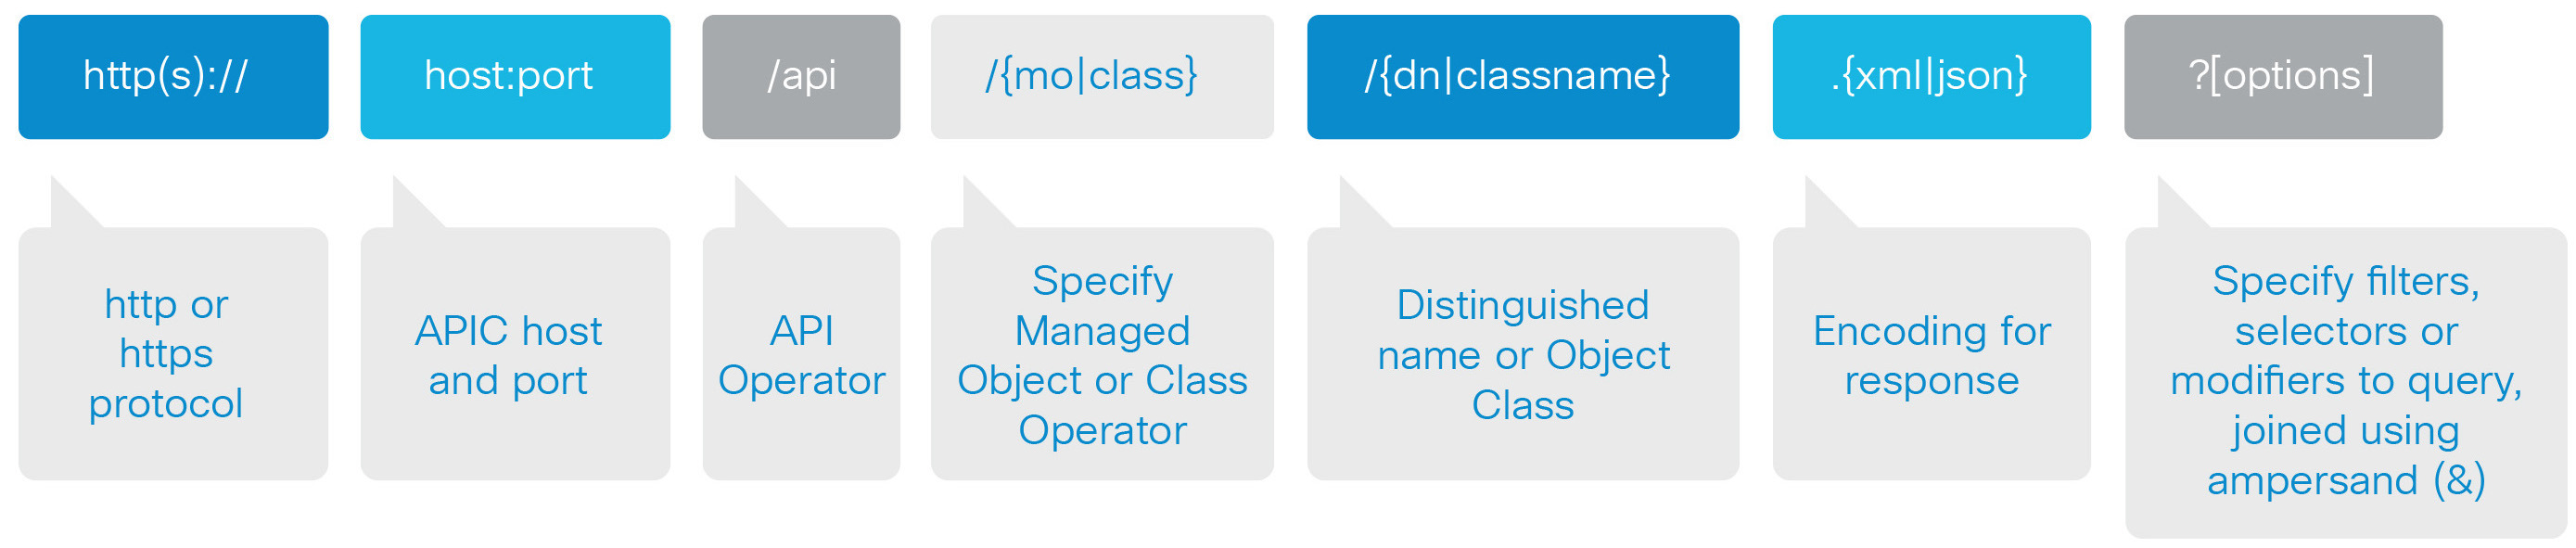
So what we do is set a variable to be the protocol, APIC host and the API that is standard across all references of the ACI fabric.
import requests, json, os


def get_aci_token():
    apic_ip = os.environ["APIC_IP"]
    apic_username = os.environ["APIC_USERNAME"]
    apic_password = os.environ["APIC_PASSWORD"]

    credentials = {'aaaUser':
                {'attributes':
                    {'name': apic_username, 'pwd': apic_password }
                }
        }

    apic_auth_url = "https://{}/api/aaaLogin.json".format(apic_ip)
With the login_url built for this fabric, we have to convert the dictionary for the
credentials information to JSON. Using the JSON library that
is part of Python, we will take the dictionary that we built for Python and create a variable that will be
called json_credentials that is what will be sent to the APIC in the REST request using the
request library.
import requests, json, os


def get_aci_token():
    apic_ip = os.environ["APIC_IP"]
    apic_username = os.environ["APIC_USERNAME"]
    apic_password = os.environ["APIC_PASSWORD"]

    credentials = {'aaaUser':
                {'attributes':
                    {'name': apic_username, 'pwd': apic_password }
                }
        }

    apic_auth_url = "https://{}/api/aaaLogin.json".format(apic_ip)

    json_credentials = json.dumps(credentials)
With the credentials in JSON format, you can proceed to create the POST request to the ACI fabric. Whenever you make a request to a REST endpoint, you will get a response. The response will be in the form of a response object that will contain the response from the server. This response object will contain the status code of the response, the headers of the response and the body of the response.
| CODE | Description |
|---|---|
| 200 | The request has succeeded. |
| 202 | The request has been accepted, but processing hasn't completed |
| 400 | Bad request. The request could not be understood by the server due to malformed syntax. |
| 401 | Unauthorized. The request requires user authentication. |
| 403 | Forbidden. The server understood the request, but is refusing to fulfill it. |
| 404 | Not found. The server has not found anything matching the Request-URI |
| 500 | Internal Server Error. The server encountered an unexpected condition which prevented it from fulfilling the request. |
You may notice in the following section that we have added the parameter to the request call verify = False. This is to tell requests library to ignore the self signed certificate that is on the APIC controller.
import requests, json, os


def get_aci_token():
    apic_ip = os.environ["APIC_IP"]
    apic_username = os.environ["APIC_USERNAME"]
    apic_password = os.environ["APIC_PASSWORD"]

    credentials = {'aaaUser':
                {'attributes':
                    {'name': apic_username, 'pwd': apic_password }
                }
        }

    apic_auth_url = "https://{}/api/aaaLogin.json".format(apic_ip)

    json_credentials = json.dumps(credentials)

    response = requests.post(apic_auth_url, data=json_credentials, verify=False)

    return response
Now that you have the function to get the token from the APIC controller, you can call the function from the main part of the script. This is done by simply calling the function by its name and then assigning the response object to a variable that you can then use to process the response from the APIC controller.
But there is a slight twist that we want to show you. Since we will want to use this code
from other scripts, we have to make sure that the code is not executed when the script is imported.
To achieve this we will use the if __name__ == "__main__": statement. This is a special
variable in Python that is set to the name of the script when the script is executed. If the script is
imported into another script, the __name__ variable will be set to the name of the script
that is importing the script. This is a way to make sure that the code in the
if __name__ == "__main__":
statement is only executed when the script is executed and not when the script is imported into another script.
import requests, json, os


def get_aci_token():
    apic_ip = os.environ["APIC_IP"]
    apic_username = os.environ["APIC_USERNAME"]
    apic_password = os.environ["APIC_PASSWORD"]

    credentials = {'aaaUser':
                {'attributes':
                    {'name': apic_username, 'pwd': apic_password }
                }
        }

    apic_auth_url = "https://{}/api/aaaLogin.json".format(apic_ip)

    json_credentials = json.dumps(credentials)

    response = requests.post(apic_auth_url, data=json_credentials, verify=False)

    return response

if __name__ == "__main__":
    post_response = get_aci_token()
    print(post_response)
At this point make sure you have saved your file. Then, return to your Terminal window.You will now execute the script in the terminal. Make sure you are in the correct directory.
cd ~/ltrdcn-3225/requests
And then run the Python script.
python3 aci_auth.py
The output of the command should be similar to the following output:
InsecureRequestWarning: Unverified HTTPS request is being made. Adding certificate verification is strongly advised. See:
https://urllib3.readthedocs.io/en/latest/advanced-usage.html#ssl-warnings
InsecureRequestWarning)
<Response [200]>
The following table shows you just a couple of the various response codes to assist you understanding this concept.
The key in that output is going to be the proper Response code, that should be 200 for OK. Also as you can see we have the warning that the request is unverified. This is because the APIC controller has a self signed certificate that is not trusted by the requests library. Let's configure requests to ignore this warning.
import requests, json, os
from urllib3.exceptions import InsecureRequestWarning

def get_aci_token():
    apic_ip = os.environ["APIC_IP"]
    apic_username = os.environ["APIC_USERNAME"]
    apic_password = os.environ["APIC_PASSWORD"]

    credentials = {'aaaUser':
                {'attributes':
                    {'name': apic_username, 'pwd': apic_password }
                }
        }

    apic_auth_url = "https://{}/api/aaaLogin.json".format(apic_ip)

    json_credentials = json.dumps(credentials)

    requests.packages.urllib3.disable_warnings(category=InsecureRequestWarning)
    response = requests.post(apic_auth_url, data=json_credentials, verify=False)

    return response

if __name__ == "__main__":
    post_response = get_aci_token()
    print(post_response)
If you run the same script again, you will see that the warning is no longer present.
In the response object created by the requests library is the authentication token that we are looking for
to gain access to the APIC controller API. The simple print command that we did print(post_response)
was to validate the response. You can extract more details on the response by simply doing a print to the same
object but invoking the text method of the object print(post_response.text).
The output will be EXTENSIVE as the text of the response is printed in itself. You can make this change if you wish to see the output. If not you can jump straight to the code that we are interested in that would extract the token from the response directly. What we are looking for is the authentication token that is needed for you to issue commands into the ACI fabric in itself.
First, we have to take the response that the APIC sent back and convert that into a dictionary
that Python can process. The response is in essence just text inside the response object
of the request library. Using the json.loads command, the string response
will be converted into a Python dictionary. At that point you can easily extract
the login attributes field from the response to get the token.
Then you have to parse the object in return to extract the token. The response dictionary will look as follows (ordering of fields is different every time):
Return to your editor. To extract that value you have to select exactly the right position in the dictionary to get
the value. In
this case post_response_json['imdata'][0]['aaaLogin']['attributes']
import requests, json, os
from urllib3.exceptions import InsecureRequestWarning

def get_aci_token():
    apic_ip = os.environ["APIC_IP"]
    apic_username = os.environ["APIC_USERNAME"]
    apic_password = os.environ["APIC_PASSWORD"]

    credentials = {'aaaUser':
                {'attributes':
                    {'name': apic_username, 'pwd': apic_password }
                }
        }

    apic_auth_url = "https://{}/api/aaaLogin.json".format(apic_ip)

    json_credentials = json.dumps(credentials)

    requests.packages.urllib3.disable_warnings(category=InsecureRequestWarning)
    response = requests.post(apic_auth_url, data=json_credentials, verify=False)
    response_json = json.loads(response.text)
    login_attributes = response_json['imdata'][0]['aaaLogin']['attributes']

    return response

if __name__ == "__main__":
    post_response = get_aci_token()
    print(post_response)
With that you can extract the token directly as the token would be in
login_attributes['token'] and we can built the cookie dictionary that will
be needed for further connections. It is always good to correctly identify the variables.
Since we are now just returning the cookie we will be needing for further connections,
change the declaration name of the variable and also the references.
import requests, json, os
from urllib3.exceptions import InsecureRequestWarning

def get_aci_token():
    apic_ip = os.environ["APIC_IP"]
    apic_username = os.environ["APIC_USERNAME"]
    apic_password = os.environ["APIC_PASSWORD"]

    credentials = {'aaaUser':
                {'attributes':
                    {'name': apic_username, 'pwd': apic_password }
                }
        }

    apic_auth_url = "https://{}/api/aaaLogin.json".format(apic_ip)

    json_credentials = json.dumps(credentials)

    requests.packages.urllib3.disable_warnings(category=InsecureRequestWarning)
    response = requests.post(apic_auth_url, data=json_credentials, verify=False)
    response_json = json.loads(response.text)
    login_attributes = response_json['imdata'][0]['aaaLogin']['attributes']
    cookies = {}
    cookies['APIC-Cookie'] = login_attributes['token']

    return cookies

if __name__ == "__main__":
    apic_token = get_aci_token()
    print(apic_token)
With that, make sure you save your Python file again and return to your Terminal window. Then, execute the script and see the cookie definition.
python3 aci_auth.py
{'APIC-Cookie': u'IP2IOcGIqUuf3u7Jb3EItLeZDDRknypcQPruHzVV25p5iveE/nACcT2jiTV56G
N051ZU61WGhj21tAM5sb5uSzOUgzjtt2hntR5MV7+em6Fgj7CEkni+4bWjAVi/Hlw9czDJp2hCCj
oOjuqZ5MExCmqHw4RNR+PXFPxLaSn0csTY+W4Kpyn2mIsLfWwfsXqsLydk4i+iiHgsZNxxKxL0H1
Woj4e6cRdBFX37W7b6ZP/RJ0Wlz1hDEd6+D+yUQQnZ0BCYrtYBWvf8q6ZsiOoR6g=='}
And with that token, all future requests to the ACI fabric can be performed. The token will expire over time, but you can write your code in such a way that it can execute all the sequence of requests to the fabric using the same authentication token. Then when completed, that token can expire and you would re-execute the authentication code to refresh and get a new token.